Wednesday, March 28, 2012

Merging SharePoint Events and Tasks in One View

In our last post we saw how we can publish a specific set of tasks from MS Project 2010 to a SharePoint Calendar list using our IntelliGantt Add In for MS Project 2010. In this post we will publish the rest of the tasks from MS Project to a task list located in a sub site to where we published our calendar events. The idea here is to parcel out tasks from MS Project to targeted destinations that are tailored for audiences (or SharePoint members in this case).

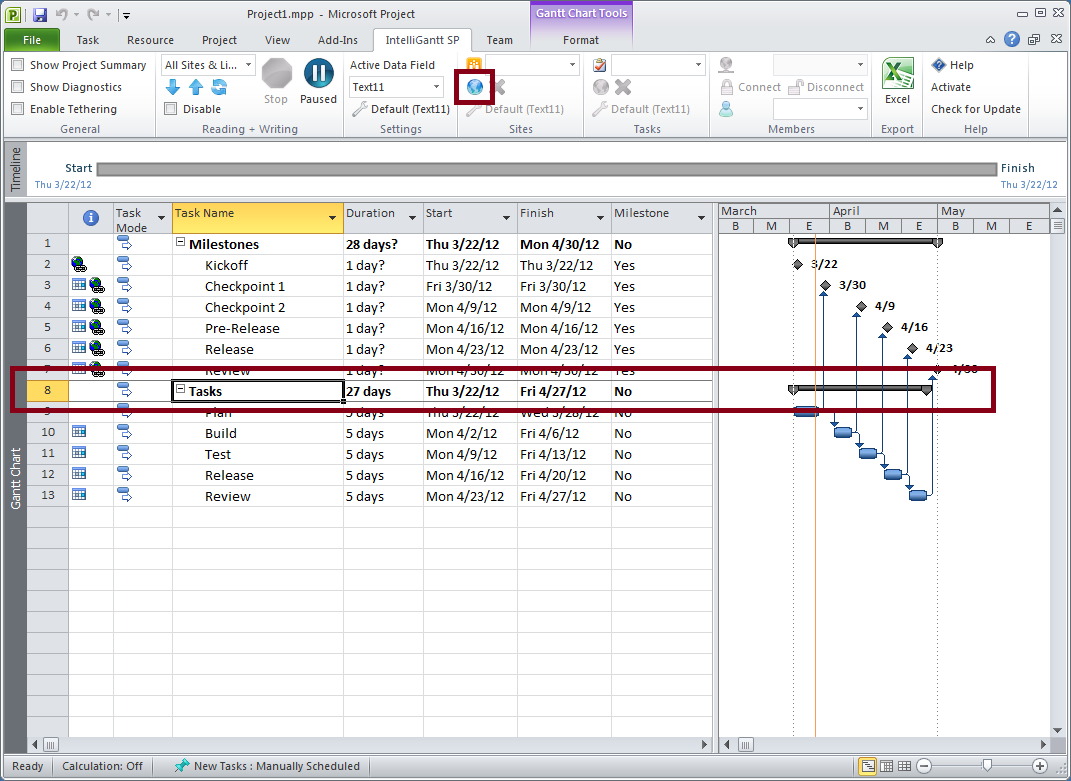
Here is the current state of our MS Project plan:

We will now send all the tasks under the 'Tasks' summary task to a separate SharePoint list. I highlighted the current settings selection to make sure it's changed back from the 'Calendar' settings we created in the last post. These settings are tailored for the rich information of task lists.

Make sure the 'Tasks' summary task is selected since this establishes our data source in MS Project and the set of tasks we will send to SharePoint. Once selected, the 'world' in the 'Sites' ribbon group lights up for you.

The steps to connect the 'Tasks' summary task to a SharePoint task list are the same as before. Provide a URL to a SharePoint site and select a task list. Notice that we are connecting to a sub site of our Demo site (where we shared the Calendar events) called Agency1. Agency1 could have completely different permissions tailored for a working group or an external resource.

By double-clicking on the selected task list IntelliGantt performs the inital share operation and, as a result, the tasks in MS Project now have hyperlinks pointing to their corresponding tasks in SharePoint.

The next question you might be asking is 'I can see the entire plan in my MS Project, but how can others see the entire project just in SharePoint?'. Great question! For that we bring in our IntelliGantt Web Part. We can place it on any SharePoint page within our demo site to see all of its tasks.

But this isn't exactly what we want. We need to see our events from the Calendar and our tasks from the Agency1 subsite. No problem. We can configure the IntelliGantt Web Part to do exactly that. Edit the web part and find the 'IntelliGantt Initialization' category. In here we will include the template ID for a calendar and define which SharePoint lists we will be using. As we remember from the last post, the template ID for a calendar is 106.

Next, we will update the 'Selected List Names' to reference both the Calendar from our current site and the Task List from our Agency1 subsite. Below is the image for both customizations:

Now when we view the IntelliGantt Web Part on our SharePoint page, we see a unified view of our Calendar events and our Agency1 tasks.

The default view for the calendar shows only the events in the current month. If you would rather see all events in the calendar, we need to change the default view to be 'All Events'. To do so, go to your SharePoint Calendar, change the view to 'All Events' and modify it so that 'Make this the default view' is checked.

Now when we view the web part we will see all the events and all the tasks:

Thursday, March 22, 2012

MS Project Tasks to SharePoint Calendar Events

When we built the new IntelliGantt Add In for MS Project 2010 Standard or Professional one of the features we were most excited about was the ability to choose a summary task within a project and send it to any SharePoint list. By default the add in will give you a choice of task lists, however, you can actually choose any SharePoint list. As it happens we've had numerous people asking if the IntelliGantt Add In can pubilsh project tasks/milestones to a SharePoint Calendar list. The answer is an emphatic Yes! Here's how you do it.

Let's start with a basic MS Project plan. There are two summary tasks, one called 'Milestones' containing milestones and one called 'Tasks' containing tasks. We've gone so far as to link the milestones to task endpoints just to give them a bit more weight.

Now we would like to get these milestones into a SharePoint Calendar to share and highlight these very important dates.

First we will select the 'Milestones' summary task to establish our root. Next, we will click on the illuminated 'world' image in the 'Sites' ribbon group. We use the dialog that pops up to connect to a SharePoint site.

By default this listing shows only the task lists, so we click 'OK' to save the site connection and move to the list connection dialog where we have more options. Click on the newly illuminated world image in the 'Lists' ribbon group. That will bring up a dialog with a few more options.

Click the 'Template ID' checkbox and enter the server template ID for a calendar list-- 106. Note that the calendar list appears in our list selection box. (For a table of more SharePoint server template IDs go here).

We're not quite done yet though. Since the default settings are geared toward task lists, we need to create a setting that is geared towards calendars. So select the 'Calendar' list and then click the 'Settings' button. The current settings dialog pops up. We will need to create new settings so click the 'Create' button.

I recommend we name the new settings something crazy, like 'Calendar'.

Finally, we will clear all the fields that our Calendar list doesn't support and map 'Start' and 'Finish' MS Project fields to something the Calendar list does support-- EventDate and EndDate.

Now we are ready to send the milestones to the Calendar list. Select the Calendar list and (optionally) choose to clear the calendar before we send the new data. Finally, click 'OK'.

In MS Project we see that all the sub tasks of the 'Milestone' summary task now have hyperlinks associated with them. Each hyperlink points to their corresponding event in the SharePoint calendar list we chose.

Let's see what things look like up in SharePoint. First a view of the milestones in the March calendar:

And then a view of the milestones in the April calendar:

Remember that we did set up the display name as bi-directional (ie. To SharePoint and From SharePoint). Therefore, changes we make to the calendar names in SharePoint can be brought back into MS Project. Also, changes to the milestone dates in MS Project can be sent to the SharePoint Calendar list as well.

Finally, if you would like to share the 'Tasks' to a SharePoint task list, simply click on the 'Tasks' summary task, connect it to a site and then a list.

Wednesday, March 21, 2012

MS Project Deadlines to SharePoint Tasks

Just a quick note to let folks know that we received a request to support the Deadline field in our IntelliGantt Add In for MS Project 2010. So now it is! It is a date time field in project and can be mapped to a date time field in your task list that you can create. By default we suggest calling it 'Deadline', though you can map it to any date time SharePoint list column.

Also, not only Deadline, but all date time fields in MS Project will pay attention to the formatting options of your date time SharePoint list columns and change behavior based on the display options. If your SharePoint date time column shows date only, then the IntelliGantt Add In will compare year, month and day only when evaluating whether the field should be updated. If the SharePoint date time column shows date and time, then the IntelliGantt Add In will compare year, month, day, hour, minute and second when evaluating whether the field should be updated. In this way we make the sync cycle smarter so that only necessary updates happen. The end result is if you have turned on 'Notify when changed' within the SharePoint list, you won't be bombarded with useless update information.

Linking to SharePoint Lookup Fields

We implemented a simple user request with respect to how the IntelliGantt Web Part works with lookup data in your task lists. The issue was we were displaying the data, but unlike the native SharePoint list information, the lookup fields were not navigable. For example, all the assignments would show as expected, but you couldn't click on a name and see the user's profile. This has been addressed with build 1.0.163 we released today.

For example, here is a screenshot of the updated web part showing the Assigned To field. The visual cue for the names has changed as now they are both blue and underlined.

Clicking on a name will match the same behavior as in SharePoint and take you to that user's profile scoped to the current SharePoint site.

However, we couldn't help ourselves from adding a little smarts. If you have a link to a discussion showing, rather than going to a single page showing that that item's instance data, we instead take you to the 'Flat' view of the entire discussion. This let's you quickly see what people are saying about a particular task.

The discussion link in the web part:

The browser directed to the flat discussion layout:

Tuesday, March 06, 2012

Bringing Textile Markers to SharePoint Text Fields

We recently put in a color splash into our IntelliGantt Web Part so that customers could start introducing their own custom fields and have them perform as key performance indicators. What you do is tell the IntelliGantt Web Part which custom field you want to key off of and then provide the colors to use. Typically this is a choice field and the color series matches the choice values.

Another customer of ours wanted to ability to highlight tasks within the web part. I thought 'hey, the new color splashes would be cool.' But what they really wanted was a bit more text formatting. Something like making the title bold, or in italics or underlined. I first started thinking about HTML markup around the text fields, naturally, but how to store that in SharePoint and still have it be readable? Not going to happen.

Then I remembered something we had on the drawing board as a result of our experience creating products for Basecamp. They use a simple Textile markup that can both instruct programs how to change text decorations and maintain readability for normal humans. So we applied the bold, italic and underline markers to all our text fields and the results look good:

What we've done is added a bit of processing to SharePoint text field resolution such that

  • If text begins and ends with *, then it is bold
  • If text begins and ends with _, then it is italics
  • If text begins and ends with +, then it is underlined

Any text field can contain these textile markings. We do have one issue with Summary Tasks because they do not accept * characters. I suppose we can offer a SharePoint errata to the Textile specification, but for now summary tasks can italicized or underlined