
Generally speaking, it makes sense to send one MS Project plan to a single SharePoint task list within a single site. However, real-life MS Project plans can get very large, easily passing one-thousand tasks items. When this happens there are often multiple groups involved that may or may not benefit from see the entire project plan.
For this reason we are introducing the ability to share any summary task within an MS Project plan to a SharePoint task list. Furthermore, the IntelliGantt Add In for MS Project 2010 even lets you share any summary task to any SharePoint site (and one of its Task Lists).
This means you can have a single large MS Project plan and 'carve' it up up collaboratively (and metaphorically) so that your planners might see tasks within a 'Planning' SharePoint site or Task list while your engineering team might see tasks under a 'Executing' SharePoint site or Task list.
First up is sharing multiple summary tasks to multiple SharePoint task lists within the same site:
Next is sharing multiple summary tasks to multiple SharePoint sites:
Which configuration you choose is up to you. In one case it may make sense to use multiple tasks lists within the same SharePoint site if you project has well-defined phases, like a scrum for example.
For other projects, where perhaps you are working with a 3rd party vendor, you may wish to share a summary task with an external SharePoint site and other summary tasks with internal groups.
However you wish to share your project, and with whomever you choose, the IntelliGantt Add In for MS Project 2010 will be flexibile enough to meet your needs.
Wednesday, November 02, 2011
Tuesday, November 01, 2011
Connect Project Resources with SharePoint Members
One of the significant issues we've seen with MS Project + SharePoint synchronization is matching MS Project resources with SharePoint members. A resource may be spelled one way in MS Project but exists as a member in SharePoint completely differently. As a result, connecting the two was a point of emphasis for the new IntelliGantt Add In for MS Project 2010.
In this video we try to show how simple it is now:
The key takeway is we've brought the task of aligning resources and members front and center now right on the ribbon. In fact, we feel this is a great example of a complicated action you can accomplished right on the ribbon that required a dialog box back in the days of menus.
Now, given any shared project, just select the MS Project resource in the bottom dropdown and the corresponding SharePoint member in the top dropdown and click 'Connect'.
Some would say it's actually intuitive now.
Thursday, October 27, 2011
IntelliGantt Add In for MS Project 2010 Intro Videos
More videos are on the way of course, but here are the first two. They show how you connect and send an MS Project plan to SharePoint, and how you connect and receive a project plan.
How to connect and send:
How to connect and receive:
We'll be making many videos over the next few days to show off all the features.
One bonus is it also shows how well the IntelliGantt Web Part supports the story.
How to connect and send:
How to connect and receive:
We'll be making many videos over the next few days to show off all the features.
One bonus is it also shows how well the IntelliGantt Web Part supports the story.
Tuesday, October 25, 2011
IntelliGantt Add In for MS Project 2010
We are finally ready to start the beta testing of our new IntelliGantt Add In for Microsoft Project 2010. This is a major upgrade from the current version and features new design philosophies reflecting the feedback we've received from users over the past 5 years. Yes, we've been working with SharePoint and MS Project for 5+ years now and we're tremendously excited with this new version as it includes:
A word (or two) about tethering. Since it looks like this Internet thing is going to catch on, we've made the transition to design the IntelliGantt Add In assuming that your computer is in fact always connected to the network. This let's us do something really cool-- immediately send your changes in MS Project to the task list in SharePoint.
Why is this a good thing? Consider the common 'sync on demand' scenario and the dreaded 'who's data wins?' connundrum. With tethering, this problem goes away because, since the changes are immediate, it's just like you've edited the SharePoint Task List itself.
Tethering also lets us take advantage of a more efficient auto-sync scenario. In fact, when combined with our Directional Data Flow, we believe the time-sink bane of project managers everywhere can be related to the dustbin. Of course I'm talking about change approvals.
In the coming days we will post examples of these exciting features, and even a few we haven't mentioned yet.
By the way, if you have a huge, hairy, nasty mpp file that can't possibly be sent to a SharePoint Task List, feel free to send it to us. We'll be happy to make sure it works.
- Rich Ribbon Integration within MS Project 2010
- Self-Contained mpp files (this means you can place the mpp file anywhere and it will know what SharePoint server and Task List to talk to)
- Multi-user support (because the mpp files are now self-contained, you can give them to colleagues and IntelliGantt will know what to do)
- Auto Synchronization configuration from 1 minute to 20 minute intervals
- Directional Data Flow (you choose which data fields go to the SharePoint server and/or come from the SharePoint server)
- Crazy Simple MS Project Resource to SharePoint Member mapping
- Tethering!!!
A word (or two) about tethering. Since it looks like this Internet thing is going to catch on, we've made the transition to design the IntelliGantt Add In assuming that your computer is in fact always connected to the network. This let's us do something really cool-- immediately send your changes in MS Project to the task list in SharePoint.
Why is this a good thing? Consider the common 'sync on demand' scenario and the dreaded 'who's data wins?' connundrum. With tethering, this problem goes away because, since the changes are immediate, it's just like you've edited the SharePoint Task List itself.
Tethering also lets us take advantage of a more efficient auto-sync scenario. In fact, when combined with our Directional Data Flow, we believe the time-sink bane of project managers everywhere can be related to the dustbin. Of course I'm talking about change approvals.
In the coming days we will post examples of these exciting features, and even a few we haven't mentioned yet.
By the way, if you have a huge, hairy, nasty mpp file that can't possibly be sent to a SharePoint Task List, feel free to send it to us. We'll be happy to make sure it works.
Friday, September 16, 2011
More Fun with Colors
The other day a customer let us know that the marketing group had a problem with adopting the IntelliGantt Web Part. The top calendar and bottom navigation controls were the wrong color. This was an instance where design (and color) matters and thankfully, because we had put in color support for tasks, we were able to quickly turn around an update that supports calendar and navigation color too. In fact, we provided an update within a week.
Here's how it works. Below is our default color palette.

I think it looks pretty good but obviously folks in marketing disagree. No problem, let's modify the 'IntelliGantt Colors' property.

We'll put in my second favorite color scheme. Note that the web part asks for two colors for both the calendar and navigation regions. We do this because a gradient looks much nicer than a solid block of color. You can enter any two colors in and IntelliGantt will show resulting blend of colors.

And the finished product:

Don't forget you can also change the branding text at the bottom right of the control as well. This will also aid in branding and keep even more folks happy.
Thursday, September 15, 2011
Creating Virtual Folders from Group By Fields
SharePoint lists come with a bevy of options for how to display, filter, sort and group information. In SharePoint 2010, for example, a basic Task List has 11 options right out of the box.

With so many levers to pull SharePoint encourages users to make many views and tailor them to their needs. What we like to do with the IntelliGantt Web Part is run right along with the views you create and provide richer visualizations.
Let's take this list for instance. It's a basic task list with a couple folders and a task item at the top level. Though it's not obvious, each folder contains a few task items as well.

Let me point out two interesting choice fields we have created-- Region and State. These are basic choice columns we created that house 4 region values (North, East, West and South) and 50 state values. Given all the view options available, a natural organization would be to group them by Region and State. This can be done via the web browser by editing a particular view.

The result is the data will now be grouped by first Region and then State, which matches how might people naturally group data across a country. Here's what the result looks like in SharePoint:

Even across the internet I can sense the underwhelm-ment. There are a number of problems with the native Group By feature when you have a hierarchy of data:
1. Even though folders have a Region and State value, their original purpose-- containing sub items-- is not necessary in the view since we want to see the items. In other words, the folders here are cluttering the important data.
2. Where is all the data? Admittedly this is our mantra-- showing you all the data in a list-- but it's certainly not clear that you have to click into each folder to gets its children in order to see there grouping.
3. Though it shows that Region and State are the grouping fields, it duplicates unecessarily by showing both Region and Region: East.
Here's how the IntelliGantt Web Part handles it. When this web part uses a view that contains Group By settings, it will re-orient itself to create virtual folders based on each items values for those settings. As a result, the hierarchy reflects the values for each field, which is a more natural way to understand what you're looking at:

Thursday, August 25, 2011
Adding and Linking Documents to Tasks - Part III
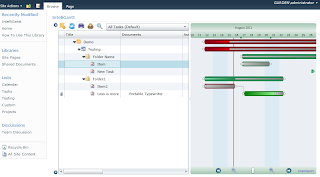
We've been exporing the new IntelliGantt Web Part feature that let's you add documents to a Shared Documents list via dragging and dropping from your computer onto a task item. In Part I we showed how to set up the lookup column to enable this feature then dragged a local file and dropped it onto a task. In Part II we showed how you can link tasks to existing documents in your document lists via in-place editing with auto-completion boxes. In Part III we will show how documents linked to tasks work with templates.
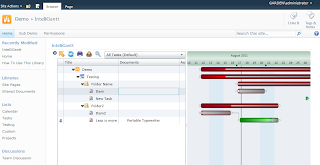
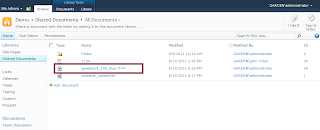
We left off with two documents associated to two tasks. With better naming, one could imagine that Folder2 is really a reusable template containing two steps we must do again and again. Furthermore, if the goal is to build a portable typewriter, then the associated document is valuable for every new portable typewriter we build.
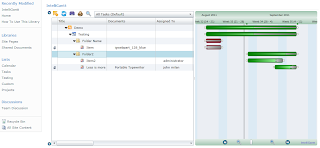
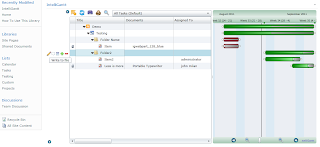
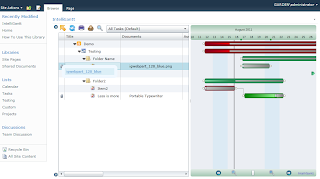
With the IntelliGantt Web Part any task or summary task can become a template. First we need to open the tool window so we can get to the pencil.

We select the folder we wish to turn into a template and click the pencil image to write information to you local computer.
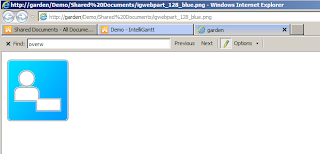
When we click on the pencil, a 'Save As' dialog appears that lets us name the file and save it to disk.
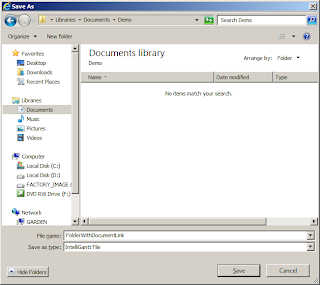
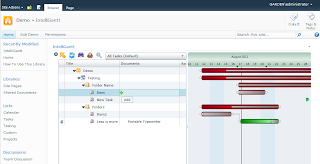
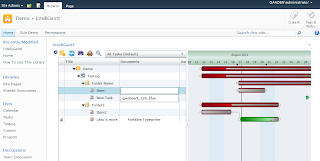
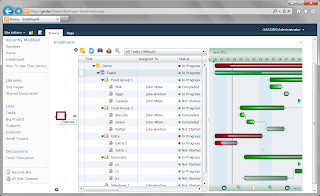
This template file with the '.igantt' extension can be used by dragging and dropping onto lists or folders in any IntelliGantt Web Part. Here, though the image doesn't show the mouse cursor, you can see the 'drop arrow' is pointing to the 'Testing' task list.
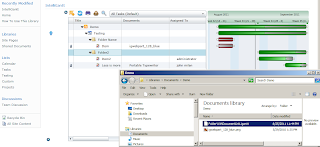
Once the template is dropped, the IntelliGantt Web Part creates the same group of tasks that seeded the template-- including their assignments and linked documents.
With this feature you can create a library of reusable project fragments that can be dropped onto any IntelliGantt Web Part list or summary task. Common tasks can be templatized such that they also contain starter documents detailing how to perform the work needed. One or more users can be pre-assigned to tasks to reduce the amount of housekeeping work in the day-to-day of a project manager. You can even store these '.igantt' template files on a file server so multiple project managers can all work with the same templates.
We left off with two documents associated to two tasks. With better naming, one could imagine that Folder2 is really a reusable template containing two steps we must do again and again. Furthermore, if the goal is to build a portable typewriter, then the associated document is valuable for every new portable typewriter we build.

With the IntelliGantt Web Part any task or summary task can become a template. First we need to open the tool window so we can get to the pencil.

We select the folder we wish to turn into a template and click the pencil image to write information to you local computer.

When we click on the pencil, a 'Save As' dialog appears that lets us name the file and save it to disk.

This template file with the '.igantt' extension can be used by dragging and dropping onto lists or folders in any IntelliGantt Web Part. Here, though the image doesn't show the mouse cursor, you can see the 'drop arrow' is pointing to the 'Testing' task list.

Once the template is dropped, the IntelliGantt Web Part creates the same group of tasks that seeded the template-- including their assignments and linked documents.

With this feature you can create a library of reusable project fragments that can be dropped onto any IntelliGantt Web Part list or summary task. Common tasks can be templatized such that they also contain starter documents detailing how to perform the work needed. One or more users can be pre-assigned to tasks to reduce the amount of housekeeping work in the day-to-day of a project manager. You can even store these '.igantt' template files on a file server so multiple project managers can all work with the same templates.
Wednesday, August 17, 2011
Adding and Linking Documents to Tasks - Part II
In Part I of this series we showed how you can connect a SharePoint Task List to a SharePoint Shared Documents List with the IntelliGantt Web Part. This covered both setting up the 'Documents' lookup column in the Task List and adding one or more documents via drag and drop onto the task item. Today we will show how you can manage task/document links and work with documents already in your Shared Documents List.
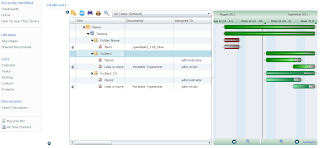
Here is where we left off yesterday. The image file 'igwebpart_128_blue.png' had been dropped onto the 'Item' task in the IntelliGantt Web Part (IGWP). IGWP both uploaded the file to the Shared Documents List, added the cell entry with the document name and created the 'has documents' icon at the far left of the grid.

When you move the mouse into the 'Documents' cell you will see '+' and '-' icons appear around the document. These let you add and remove document links. For example, here we will remove the document link:

The cell entry disappears and the helpful icon indicator does too. But while this removed the visible link in IGWP, the document is in fact still in the Shared Documents List.
We can actually re-link the same document with the same task again by using the '+' icon to add this link:
IGWP will scan the Shared Documents List and provide an auto-complete box for you. This way you easily find the document you with to link by name:
Now the document has been re-linked with the task. It's visible within the 'Documents' column and has the helpful 'has documents' icon once more.
Tomorrow we will look at using this same linking concept with templates in Part III.
Here is where we left off yesterday. The image file 'igwebpart_128_blue.png' had been dropped onto the 'Item' task in the IntelliGantt Web Part (IGWP). IGWP both uploaded the file to the Shared Documents List, added the cell entry with the document name and created the 'has documents' icon at the far left of the grid.

When you move the mouse into the 'Documents' cell you will see '+' and '-' icons appear around the document. These let you add and remove document links. For example, here we will remove the document link:

The cell entry disappears and the helpful icon indicator does too. But while this removed the visible link in IGWP, the document is in fact still in the Shared Documents List.

We can actually re-link the same document with the same task again by using the '+' icon to add this link:

IGWP will scan the Shared Documents List and provide an auto-complete box for you. This way you easily find the document you with to link by name:

Now the document has been re-linked with the task. It's visible within the 'Documents' column and has the helpful 'has documents' icon once more.
Tomorrow we will look at using this same linking concept with templates in Part III.
Monday, August 15, 2011
Adding and Linking Documents and Tasks - Part I
It's been a quiet month on the blog which can only mean one thing-- new feature time!
We introduced a great way to add local files as attachments to tasks by using one of the most familiar gestures: drag and drop. Not long after customers began asking us if we could also use drag and drop to add files to a Shared Library and have it link to the task. The benefit here is then, unlike attachments, documents associated with tasks could support versioning, permissions and other advanced features.http://www.blogger.com/img/blank.gif
We're happy to say we heard you and are proud to introduce the simplest way to 1) add one or more files to a Shared Documents list by drag and drop and 2) automatically link them to the task you dropped them on.
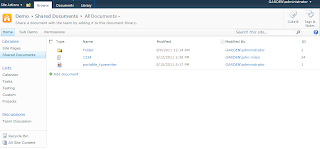
Here's how it works. Below is the IntelliGantt Web Part visualizing a simple SharePoint Task List. You'll note this SharePoint site actually has multiple task lists, but we used the explorer feature to select as single task list.
Also in this SharePoint site is the common Shared Document list. As you can see we have a folder and a couple documents within the list.
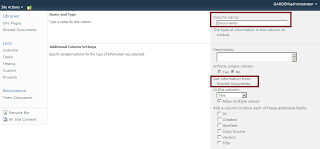
Here is the one plumbing step required for things to work. What we need to do is add a Lookup Column to a Task List and associate it with the Shared Documents list. Here is the lookup column we created. And yes, it does need to be named 'Documents' for the IntelliGantt Web Part to recognize it:
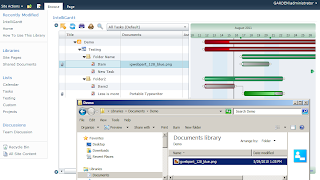
Now we can open Windows Explorer on our local PC, find a file and drag/drop it onto a task. Notice the 'upload arrow' that appears to help identify the task drop target:

Once the file has been dropped the IntelliGantt Web Part will detect if a 'Documents' column pointing to a Shared Documents library is in the task list view. If a 'Documents' column exists then IntelliGantt Web Part will upload the dropped file or files to the defined Shared Documents list. As a result, first you see the document associated with the task visually:
And we can also see the document has in fact been uploaded to the Shared Documents physically:
Since it's in a document list we can checkout, edit and version the file for a more complicated work item. Back in the IntelliGantt Web Part, because the file is linked to the task, you can always mouse over the attachment to quickly navigate to documents. First point...
... then click.
In Part II we will see how IntelliGantt Templates take advantage of these linked documents to create reusable components that can automatically link with existing documents.
We introduced a great way to add local files as attachments to tasks by using one of the most familiar gestures: drag and drop. Not long after customers began asking us if we could also use drag and drop to add files to a Shared Library and have it link to the task. The benefit here is then, unlike attachments, documents associated with tasks could support versioning, permissions and other advanced features.http://www.blogger.com/img/blank.gif
We're happy to say we heard you and are proud to introduce the simplest way to 1) add one or more files to a Shared Documents list by drag and drop and 2) automatically link them to the task you dropped them on.
Here's how it works. Below is the IntelliGantt Web Part visualizing a simple SharePoint Task List. You'll note this SharePoint site actually has multiple task lists, but we used the explorer feature to select as single task list.

Also in this SharePoint site is the common Shared Document list. As you can see we have a folder and a couple documents within the list.

Here is the one plumbing step required for things to work. What we need to do is add a Lookup Column to a Task List and associate it with the Shared Documents list. Here is the lookup column we created. And yes, it does need to be named 'Documents' for the IntelliGantt Web Part to recognize it:

Now we can open Windows Explorer on our local PC, find a file and drag/drop it onto a task. Notice the 'upload arrow' that appears to help identify the task drop target:

Once the file has been dropped the IntelliGantt Web Part will detect if a 'Documents' column pointing to a Shared Documents library is in the task list view. If a 'Documents' column exists then IntelliGantt Web Part will upload the dropped file or files to the defined Shared Documents list. As a result, first you see the document associated with the task visually:

And we can also see the document has in fact been uploaded to the Shared Documents physically:

Since it's in a document list we can checkout, edit and version the file for a more complicated work item. Back in the IntelliGantt Web Part, because the file is linked to the task, you can always mouse over the attachment to quickly navigate to documents. First point...

... then click.

In Part II we will see how IntelliGantt Templates take advantage of these linked documents to create reusable components that can automatically link with existing documents.
Wednesday, July 20, 2011
TeamDirection Outlook Basecamp Integration-- TOBI
A quick note to let everyone know a new product has been introduced to the TeamDirection stable-- TOBI. As you might surmise from the title, TOBI connects MS Outlook 2007 & 2010 to Basecamp.

You give TOBI the URL to your Basecamp dashboard and TOBI let's you select which projects to bring into Outlook. Once selected, all the Milestones, Todo Items, Comments and Attachments will be visible within Outlook.
Of course, we didn't stop there. TOBI supports both instant updates and automatic synchronization. Instant updates happen when you make a change to a connected Outlook item. For example, if you mark a task as complete in Outlook, then the corresponding Basecamp item will be marked completed as well-- immediately.
Conversely, if you update an item in Basecamp via your web browser, TOBI periodically checks for changes in Basecamp. The interval is configurable but the default is every 15 minutes. When a change is spotted, then the Outlook task is updated.
There are many more features like enhanced data and 'smart' collision resolution that we will be covering in the days ahead. In the meantime, if you'd like to check TOBI out here is a 'Getting Started' page and the install page.
Tuesday, June 28, 2011
Heads Up! How to Combine Tasks with Announcments
One sign of a well engineered product is when customers call you and thank you for creating a feature that really helps them out. The other sign is when it never occurred to you the product could actually perform said feature. Invariably when this happens, the use case turns out to be a really good idea. So I thought I'd pass it along.
As you know, we created the IntelliGantt Web Part for SharePoint to look for Task Lists by default. Of course we also wanted to be able to include custom lists, specialized lists and heretofore unknown lists created by IT departments that could also serve as task lists.
But it never occurred to us to add the Announcements List into the mix. Thankfully it did to one customer.
They added an announcements list to the IntelliGantt Web Part so that folks could have an easy 'heads up' to the most important things of the day pertaining to a project. Our goal as always been to minimize the context switches as users work with the data. Including the announcements within the IntelliGantt Web Part is right inline with this philosophy.
Here's what it looks like:

As you can see the announcements list can be positioned right at the top. Also, the intrinsic nature of this list lends itself well to the day-to-day of projects as announcements are only visible for a specific amount of time. Once the announcement goes 'stale', it drops off the list and new announcements appear. The end result is the project manager has just increased the odds that team members will see important communications in context.
If you'd like to experiment with this a bit, you just need to know the server template id for the SharePoint Announcements List-- 104. Plug this value into our 'Include Template ID' property as shown below:

Finally, this same technique will work just as well with any SharePoint list. But we thought it was so neat to use a 'lowly' announcements list to accomplish something quite useful-- telling people the importing news of the day right within their project.
The Five Year Zoom
Well, that's what we called our increased timescale miniaturization internally. The exact amount of time you'll see on the Gantt will depend on the width of your monitor-- we can compress time but we cannot change the laws of physics :).
For instance, if you have a 23-inch monitor and you go to 'Full Screen' mode then you should be able to see a five span for the Gantt chart. We received this request from construction companies and governments (which surely can't be a coincidence) who often manage projects spanning many years. So as of version 1.0.107 these customers will be able to see the even bigger picture.
We did update the presentation just a bit as well to handle the new zoom factor. For example, here is a project in the default zoom:

As you can see this projects extends well past the timeframe for this view. However, if we slide the 'zoom thumb' all the way to the left, we see the project easily fits within the display:

Notice that at the highest level, the 'major calendar' section shows the year and the 'minor calendar' section shows the half year. We shortened this to H1 for the first six months and H2 for the second six months.
Everything is vector-based of course so there is no perfomance penalty for any zoom magnification level you may choose. And naturally the larger the monitor and the greater the number of pixels the more time we can fit on a page. So, if you really need to see a decade worth of project tasks in a Gantt Chart, you have the justification needed to request that super-thin LED 46-inch monitor.
Or just let us know if you need the 'Decade Zoom'. Either way, we're happy to help.
Friday, May 13, 2011
Mapping Start and Due Dates to Estimates
We have a new feature in the IntelliGantt Web Part, the ability to map start and due dates, that I'd like to highlight with an actual use case. A few customers have asked if its possible for one task list within SharePoint to contain both current and estimate start/due dates and do a comparison between the two.
Let's go to an example. Here is a task list with the standard Start Date and Due Date columns defined. To this we also added EstStart and EstDue, short for Estimated Start Date and Estimated Due Date.

All the data we need is there, but it can be difficult to spot delta's between current and estimate values in this view. So what we've done is create a single SharePoint page with two IntelliGantt Web Parts added to it. The top one shows the current Start Date and Due Date and the bottom one shows the EstStart and EstDue dates.

Even though you see two IntelliGantt Web Parts, the underlying data is coming from the same task list. What we did was configure the second IntelliGantt Web Part to use the estimated start/due date columns and specify which view to use-- the 'Estimates' view. Doing so ensures that when anyone visits this page, this will be the initial presentation they see.
The mapping is done by going into the web part editor and opening the 'IntelliGantt Mapping' category:

The other adjustment we did was to set the initial view on the bottom IntelliGantt Web Part:

By doing so we can craft the columns to display so that the estimates show up. This is possible because the IntelliGantt Web Part adapts its task list display to match the viewable columns defined in your SharePoint list view.
This result is you can view two complete charts of the same data and quickly identify discrepancies-- like all the tasks within the 'Extra' folder taking an extra bit of time.

Tuesday, May 10, 2011
Now Supporting SharePoint Online in Office 365
Just a quick note that we have validated our IntelliGantt Web Part for SharePoint Online in Office 365. The folks at Microsoft we're kind enough to let us work with the beta and, after a couple hops and a skip (but no jumps!) we had the sandbox version up and going.
We could even put the web part into the Project Management category, which we are excited about:

And here it is running within our teamdirection.sharepoint.com site, which is 100% fully SharePoint Online within Office 365.

The really cool thing is you get complete web part editor backpage support so configuring the IntelliGantt Web Part is a snap. And for consultants setting up Office 365 sites for their clients, don't forget about our branding features.
Tuesday, April 26, 2011
SharePoint Task and Discussion List Integration
Plenty of statistics abound highlighting the importance of communication within projects. So much so that in addition to tasks, SharePoint also includes a Discussion List with which to share thoughts and ideas. However, because tasks and discussions are in two different lists it's not immediately obvious how best to discuss a specific task, or to find discussions about tasks 3, 4 and 5. On top of that, there is a significant transition required to move from a task you just scrolled into view, to a topic somewhere in the discussion list and back to the same position in the task list.
Naturally we couldn't let another day go by without addressing this situation so we've enhanced our IntelliGantt Web Part to integrate with SharePoint's out-of-the-box Discussion List. The goal was to provide an easily found anchor point to a topic (a task), eliminate the need for a dreaded context switch and encourage more participation in general. Here's what we came up with.
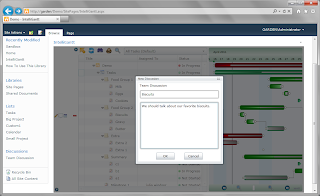
In the 'tool window' to the left of the task list, when you move the mouse into it a set of actionable icons appear for the current row. If you have one or more Discussion Lists in your SharePoint site, IntelliGantt will find it and present the 'Discuss' icon. Single click on it to create a new topic:
A popup dialog appears with the title of the task as the new topic name and a text box to type your message in:
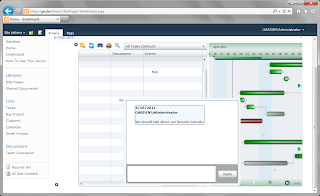
This creates the new topic within the Discussion List. To solve the context switch issue, we also created a new column in our Task List called 'Discussions'. This is a standard Lookup Column that links to the Discussion List. The IntelliGantt Web Part will add a link for you into this task field so that the discussion is linked with the task.
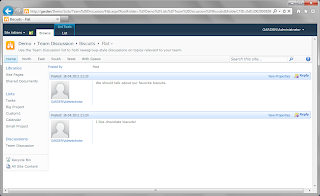
Now that this information is available, when you view the Discussions column in the task list and mouse over an entry, the IntelliGantt Web Part will show you the entire discussion thread:
Of course, there's only the initial message in this discussion. So we made it really easy to respond to messages right inline by providing a 'Reply' button.
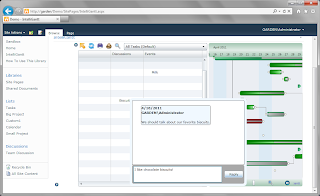
This both solves the context switch problem and encourages participation by making it easy to view and respond.
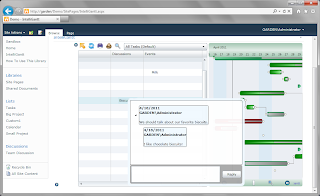
The actual data is stored within a Discussion List of course, which makes it available for searching and for backup procedures.
We have a more detailed walkthrough on our website and additional information to help set up the option lookup columns for cross-linking tasks and discussions.
Naturally we couldn't let another day go by without addressing this situation so we've enhanced our IntelliGantt Web Part to integrate with SharePoint's out-of-the-box Discussion List. The goal was to provide an easily found anchor point to a topic (a task), eliminate the need for a dreaded context switch and encourage more participation in general. Here's what we came up with.
In the 'tool window' to the left of the task list, when you move the mouse into it a set of actionable icons appear for the current row. If you have one or more Discussion Lists in your SharePoint site, IntelliGantt will find it and present the 'Discuss' icon. Single click on it to create a new topic:

A popup dialog appears with the title of the task as the new topic name and a text box to type your message in:

This creates the new topic within the Discussion List. To solve the context switch issue, we also created a new column in our Task List called 'Discussions'. This is a standard Lookup Column that links to the Discussion List. The IntelliGantt Web Part will add a link for you into this task field so that the discussion is linked with the task.
Now that this information is available, when you view the Discussions column in the task list and mouse over an entry, the IntelliGantt Web Part will show you the entire discussion thread:

Of course, there's only the initial message in this discussion. So we made it really easy to respond to messages right inline by providing a 'Reply' button.

This both solves the context switch problem and encourages participation by making it easy to view and respond.

The actual data is stored within a Discussion List of course, which makes it available for searching and for backup procedures.

We have a more detailed walkthrough on our website and additional information to help set up the option lookup columns for cross-linking tasks and discussions.
Thursday, April 21, 2011
SharePoint Task and Calendar List Integration
SharePoint is a great way to share task and calendar information online with your colleagues, has the capability to richly integrate task and calendar lists but out of the box it's lists are basically rooms of information under the same roof-- a SharePoint site. Showing folks how to view a task list in calendar format is one of our most popular blog posts. However, this option shows everything in a Calendar and you lose the inherent goodness of a task list the the specificity of important events.
The IntelliGantt Web Part integrates your task list and calendar list so that they can work together. It provides two important capabilities:
1) The ability to selectively choose which tasks to 'surface' in a SharePoint calendar.
2) The ability to see this relationship in context with the task.
For example, in a project of several hundred tasks not everything requires an event-- even if you're an event planner. Only a subset requires placement on a calendar, and it should be dynamic enough that as things change events linked with tasks can be removed and new ones easily added.
With the IntelliGantt Web Part you can use our new tool window to quickly identify the task information you'd like to link an event with by using your mouse:

The information from the task is then applied to the new event. Task start and due dates become event start and end dates. The task comments become the event comments.
Furthermore, if you provide a lookup column in the task and calendar list IntelliGantt will use them to cross-link the task and calendar event. The result is you can swiftly move from event to task and back again. Or, within IntelliGantt, you can view a task and hover over it's linked events to quickly see the very latest important information without leaving the context of your project:

Less clicking means fewer context changes which means you can stay focused on the task at hand.
We have a page dedicated to this feature showing more detail. Better yet, you can try out the IntelliGantt Web Part and start working in tasks and calendars today.
Wednesday, April 20, 2011
iPad Using SharePoint Web Services
If you searched for 'iPad SharePoint lists.asmx", 'iPad SharePoint UpdateList' or something of that ilk chances are you arrived at this blog. This is interesting if for no other reason than there is no help available for consuming SharePoint web services from an iPad that I can find as of this blog's posting.
Anyone from Microsoft willing to help me connect an iPad to SharePoint via web services?
Anyone from Microsoft willing to help me connect an iPad to SharePoint via web services?
Sunday, April 17, 2011
Grouping Items by their Modified Date and Time
A quick post to let you know of a new feature we recently added to the IntelliGantt Web Part- a built-in view to group items by their modified value.
You can sort of achieve this by editing a SharePoint view so that the sort is performed on the Modified field. However, that just changes the display order of the items. We went a step further and created a series of 'temporal folders' to contain items modifed within the last 15 minutes, within the last hour, within the last day and so on. Here's what it looks like:

You can also combine this with the filters, of course, to see who has changed what recently as well. For instance, if you're waiting for a colleague to finish an important task, you can filter on their name and see if they've changed anything in the last 15 minutes.

Or a project manager could use this to see if anyone has updated any of their assigned tasks before a big team meeting.
Subscribe to:
Posts (Atom)


