Tuesday, December 28, 2010

Basecamp Todo Items with Hours and Cost Information

The IntelliGantt Web Part for Basecamp lets you keep additional fields associated with specific Todo Items. Two such fields are Hours and Cost. Because they are numbers, the IntelliGantt Web Part for Basecamp will do basic rollup calculations. Both of these fields can contain decimal numbers.

Below is the initial view you may see for a Basecamp project.


If you scroll the task grid all the way to the right, you will see these two additional fields: Hours and Cost. They will not be available in the Basecamp UI, but their data is stored in Basecamp so every other user of the IntelliGantt Web Part for Basecamp will see the same data values.


Here we enter a few Hour values. Notice that the Todo List container the Todo Items rolls up the hours. Likewise, notice that the top level project rolls up the hours as well. This gives you a high level view of the hours in your project.


Similarly, the IntelliGantt Web Part will work the same for the Cost field.

Monday, December 27, 2010

Drag and Drop Local FIles onto Basecamp Todos and Milestones

We showed how dragging and dropping works with our IntelliGantt Web Part for SharePoint product, now let's see how you can drag and drop files from your computer onto Basecamp Todo Items and Milestones. This makes it easy to add multiple files to Basecamp using an elegant UI gesture everyone is familiar with and provide important context for why these files are in the project.

First, you need the IntelliGantt Web Part for Basecamp and a File Explorer. Here we show the Windows version.


Select one or more files, hold down the button to start dragging and move the mouse over your Todo Item or Milestone.


When your drag cursor is over an acceptable drop target (a Todo Item or Milestone), the IntelliGantt Web Part for Basecamp shows you an 'upload' arrow on the same row.

Once you drop the file, a dialog pops up for you to add a comment to (the files will be attached to this comment).


After typing in your comment, the files are added to Basecamp and associated with the Todo Item or Milestone.


If you mouse over the paperclip you will see a listing of all the files attach to the Todo Item or Milestone. You can click on any of these individual file lists and open up the target file.


If you are an administrator, you will see a '-' symbol. You can remove a comment (and the associated attachments) by clicking on the '-'.

When you mouse over the task in the Gantt Chart, you will see the full comment you added.


Finally, the comment containing files attached to you Todo Item or Milestone is stored in Basecamp and accessible via the web browser as you would expect.

Thursday, December 23, 2010

Editing Basecamp Todo Item Schedules

With the IntelliGantt Web Part for Basecamp you have the ability to not only change Due Dates for Todo Items and Milestones, but also to give Todo Items a Duration by establishing a Start date as well. Furthermore, you can link any two Todo Items in a typical task dependency relationship by dragging from the predecessor Todo Item's Endpoint to the successor Todo Item's Startpoint.

We created a detailed forum entry to show you how it's down. For example, here is an image describing the task dependency feature:


Also, the IntelliGantt Web Part for Basecamp supports a 'Read Only' mode that may be useful when you wish to share project information but don't want folks to change things.

Read Only information is also covered in the forum.

Wednesday, December 22, 2010

Grouping SharePoint Tasks by Assigned To

It's important to have an online location like a SharePoint Task List to share task information with your team. It's also very helpful to have multiple views you can apply to task lists in order to organize task data for you team members. SharePoint views handle the great majority of cases, but we found one particular view we could add value to-- By Assigned To.

This is an important view for both team members and project managers because it allows you to organize by person first and then task-- the opposite of the default task first and then additional meta data, of which Assigned To is one column.

For example, here is the default task list view in SharePoint:


This particular list also contains summary tasks (called 'Folder 1') containing sub tasks. SharePoint doesn't show a full hierarchy so you have to click on 'Folder 1' to see its sub tasks in a separate page:


If we return to the topmost part of the task list, we can apply the 'By Assigned To' view that comes with SharePoint out of the box:

Select the view --


And see it applied --


While the data is there, it's not very effective. There are two main problems. First of all, the orientation is still Task first, then Assigned To as one of many data columns. Second, the view is only applied to your page context-- remember those sub tasks under Folder 1? You can't see them.

The IntelliGantt Web Part solves both of these issues. First, by default we show you the full hierarchy of your task list (including that predecessor task dependency):


Next, we created a 'Resource' view that puts the people first! That is to say, we group all the tasks under a new 'Person' item, which we think provides a more intuitive display for folks to understand.

Select the 'Resources' --


And see it applied --


This let's you see all the tasks from the hierarchy in one view, organized by grouping them under people. Much better.

By the way, you can click on a 'Person' image and your web browser will open up SharePoint's information page for that person.

Tuesday, December 21, 2010

Viewing All Basecamp Milestones, Todo Lists and Todo Items Across All Projects

We've just enhanced the IntelliGantt Web Part for Basecamp to support viewing all the milestones, todo lists and todo items from the projects of your choice. You can select a single project, multiple projects or all projects. We've tested the IntelliGantt Web Part for Basecamp with thousands of items and it scales very well, providing you a great user experience now and in the future as your projects grow.

Furthermore, we've created several ways to view your Basecamp items--

1) A Default view that shows everything
2) A My Todos view that shows only todo items assign to you
3) A Milestones view that shows only milestones
4) A Resources view that groups all milestones and todo items by assignments.

And, of course, this is all done across as many Basecamp projects as you'd like.

Here's a screenshot of the Resources view.


You can try it yourself today and see what you think.

Monday, December 20, 2010

Attach Files to Task with Drag and Drop

One of the best reasons to use a Silverlight control on a SharePoint web page is you get rich features everyone expects. Perhaps the simplest, most intuitive one is dragging and dropping a file. It also happens to be one of the most powerful and we're happy to make it possible in our IntelliGantt Web Part for SharePoint. Now you can drag a file from your computer, drop it onto a SharePoint tasks and have it saved as an attachment.

This is a natural extension of how tasks are performed as often there is some digital output that can be associated with the task. While it was possible to add attachments before, the user experience was clunky and did not leverage the well-ingrained drag and drop metaphor.

Here is our forum page detailing how it works.

And here is what it looks like.


What's more, we also made it interactive. This means we popup supporting information when you mouse over the paperclip image. A popup list box will appear containing the names of each file attached to the task. You can select any name and the attachment will appear in a new browser window for you.

Finally, as easy as we made it to add files, we allow you to remove them individually as well. Simply click on the '-' symbol to the right of the file name to remove that attachment from the task.

And if this is just a bit too much power for you, you can disable this feature so that you can view and select attachments, but not add or remove them.

You can check out this web part today, either as a full-fledged WSP to install, or as a simple, quick desktop client demonstration.

Thursday, November 11, 2010

Reading Predecessors from SharePoint

We've received many requests for this feature and we're happy to say 'it is here!' What is the feature, you ask? The ability to receive Predecessor information from a SharePoint task list and update the task dependencies in IntelliGantt and MS Project. Basically, with a click in the 'From SharePoint' column, a project manager can enable users to create predecessors in SharePoint and have them show up in their local tool.

Here it is in action. First let's create a very simple MS Project plan.


After we publish it to a SharePoint task list using the IntelliGantt Add In for MS Project, here is our data in SharePoint.


In SharePoint 2010 there is a 'Predecessors' column that let's you add task dependencies. While not available out of the box in SharePoint 2007, you can actually create the same 'Predecessors' column by creating a Lookup column based on task titles. As long as you name the column 'Predecessors', IntelliGantt will recognize it and happily work with it.

So, let's create some predecessors via SharePoint, like so:


Hmm... looks like we created a circular task dependency. I hope things turn out ok.

Before we perform the update with IntelliGantt, we need to make sure it knows about the Predecessors column. We open the 'Workspace Settings' screen by choosing IntelliGantt->Project->Settings. In this case, we will mark both the 'To SharePoint' and 'From SharePoint' columns as active. This means IntelliGantt will do a bi-directional sync on the Predecessors column.


Perform the sync by choosing IntelliGantt->Update and the task dependencies will be created on the desktop too:


And look, IntelliGantt noticed the circular dependency and it didn't cause any trouble. As it processed the SharePoint data it checked to make sure each dependency was acceptable. Having Task 3 dependent on Task 2 was not, so the dependency wasn't created.

Wouldn't it be smart if IntelliGantt updated the SharePoint task list so that it didn't have the circular dependencies anymore? We thought so too. Here's what the SharePoint task list looks like after the IntelliGantt sync:

Tuesday, November 09, 2010

SharePoint Forms Based Authentication Support

Just a quick note to mention that the latest IntelliGantt Web Part for SharePoint (version 1.0.35) supports forms based authentication when running 'out of browser'.


Basically, the IntelliGantt Web Part for SharePoint can be installed on your PC or Mac(!) desktop as an 'Out of Browser Application'. Or 'Rich Internet Application'. It's literally a right-mouse click away-- no downloading setup.exe or MSI installation packages.

In fact, you can try it out right now by going to our IntelliGantt Web Part Demo page and right-clicking anywhere within the application.


Clicking on 'Install IntelliGantt Web Part onto this computer...' will, just as you suspected, install it on your computer. Note, if you'd like to remove it, start the IntelliGantt Web Part application on your computer and then right-click on it. Then the menu option will be 'Remove this application...'. When an 'Out of Browser' application is removed nothing is left behind.

Once running the IntelliGantt Web Part from your computer, a new icon appears on the top row for configuration:


Click the 'configuration' icon to throw a wrench in... er... open a panel that let's you set the URL of the SharePoint site:


And set the username and password to use. Be sure the 'Use Forms Based Authentication' checkbox has the check. Then IntelliGantt will use FBA when it communicates with your SharePoint server.

Monday, November 08, 2010

Simple Scheduling with SharePoint Tasks

We're going to have to come up with a signature line like 'New Feature Monday' or 'Feature of the Week' as we roll along enhancing the IntelliGantt Web Part. Today we will take a look at scheduling and how a project manager can grant or revoke scheduling privileges.

With 'Edit Schedule' set to true, as shown here via the standard web part editor tool, IntelliGantt will respond to left-mouse clicks over the schedule endpoints.


When you move the mouse over an endpoint it will turn dark gray.


If its a milestone, which looks like a single dot because the start and finish dates are one and the same, when you drag it will remain a point in time. If you'd like to turn a milestone into a task with distinct start and finish dates, hold down the 'shift' key and drag to the right (into the future!). The task body will appear, filling the space as you drag the finish date.

If you wish to turn a task into a milestone, simply drag the finish point over the start point.


You can change a task's start and finish date by clicking its body and moving forward and backward in time. You can change multiple tasks by moving a Summary Task containing sub tasks forward and backward in time.


Finally, you can link any two tasks together by hovering the mouse over an endpoint, left-click down and drag to a target task. Once you move out of the source task's row a line appears showing you are in 'link mode'. The result is a task dependency that shows both in the IntelliGantt Web Part:


And in SharePoint:


Finally, the IntelliGantt Web Part can both show you the list of task dependencies when you hover over a task endpoint, or navigate to task dependencies when you click on a predecessor or successor task of your choice. To see this in action please check out the screencast which shows the nifty animation accompanying the action.

These images were pulled from the screencast and show our SharePoint connectivity. Everything you see in this demo can also be done when the IntelliGantt Web Part is working with Basecamp as well.

Thursday, November 04, 2010

IntelliGantt Web Part for Basecamp

We just posted an update to our IntelliGantt Web Part and have some exciting news-- we are introducing Basecamp support!


There are still two major features we will be putting into the product to better support Basecamp-- views and ad hoc searching-- but the basic connectivity is in place. As of today you can:

- View one or more of your Basecamp projects together in one tool in a hierarchy.
- Give your Basecamp Todo Items a Start and Due date.
- Link two Basecamp Todo Items together as dependencies
- Reschedule a Todo Item, Todo List or entire project by drag and drop
- Print

Perhaps the most exciting feature, because we've been getting asked this a lot, is that it runs on a Mac as well as a Windows PC.

There are two requirements: 1) You must install Silverlight and 2) You must install the IntelliGantt Web Part for Basecamp as an 'Out of Browser' application.

Don't worry, it's as simple as right-clicking the mouse (or simulating a right-click for those Mac users :) on the web part. We provide all the steps in our forum.

Once the IntelliGantt Web Part for Basecamp is up and going, you have a constantly updated view of your Basecamp projects. Every team member using the web part will see the same data, such as those dependencies and start/finish dates.

Let us know what you think. We're excited to bring the next generation of tools to Basecamp and look forward to your feedback.

Wednesday, October 20, 2010

Including Custom SharePoint Task Lists

By default the IntelliGantt Web Part includes the standard, 'out of the box' task lists that ship with SharePoint 2007 and SharePoint 2010. It will also find the task lists described in the 'Fabulous Forty' templates for SharePoint 2007. When found, IntelliGantt can then display the task list in its rich interface.

But what about custom lists you may have created in house and are based on a standard task list? How can IntelliGantt know about those too?

With our new Include/Exclude Template ID feature.

Out of the box the IntelliGantt Web Part will look for lists with the following server template IDs:

107 (the basic task list)
150 Project Tasks
1104 Deliverables task list customization
7142 Budgeting task list customization
7143 Budgeting Milestones task list customization


This can be extended by adding more list template IDs to the IncludeListTemplateIDs parameter in either the Web Part Editor backpage or via the initParams section for the Silverlight control.

Furthermore, if you want to make sure people use a specific task list (like one of your custom ones) you can exclude any or all of the built in IDs above with the ExcludeListTemplateIDs parameter.

Detailed syntax for developer folks is in our forum.

We hope this will make it easier to package the IntelliGantt Web Part with custom solutions developed by system integrators or in-house developers.

Tuesday, October 19, 2010

Automatically Selecting the SharePoint Task List and View

System integrators, SharePoint admins and project managers have been asking for more ability to seed the IntelliGantt Web Part with task list and view information (and more). We just posted release 1.0.33 which has the following features:

Select the initial task list
Select the initial task list view
Apply keywords
Include SharePoint List Template IDs
Exclude SharePoint List Template IDs
Preset the 'Explored' Selections

And more. We will be providing more technical information in our forums (as linked above). Because the Task List and View selection has been so often requested, though, I'd like to introduce it here.

If you don't have IntelliGantt preset to anything and just drop it in a SharePoint site, when a user first views the control IntelliGantt will find all the task lists within the site and, by default, select the site and 'Default' to display initially.


However, if you would like to control what Task List and View is selected, then invoke the 'Edit Web Part' command (assuming you have the privilege) and go to the 'IntelliGantt Initialization' category.


In this mini-example we will seed the IntelliGantt Web Part to select the 'Tasks' list and use the 'My Tasks' view. Let's make sure the current user is assigned to a few tasks first so the result isn't underwhelming.


For this example I'm logged in as Administrator, but I could be anybody who has privileges to edit the web part.

Next, we will fill out the 'Selected List Path' and 'Selected View Name' fields. Our forum contains more detailed information on how to populate these fields.

For example, here we have filled out the Selected List Path and Selected View Name.


Once we hit the 'OK' button, anytime the IntelliGantt Web Part is rendered for the first time it will use these supplied values. As a result, when I (the Administrator) now view the control, the first thing I see will be:


The 'Tasks' row selected and the 'My Tasks' view applied so that I immediately see what's on my plate.

Monday, October 11, 2010

Changing Colors in Gantt Chart

[17 February 2011 Update - Build 1.0.70 adds even more color options with a default palette and the ability to create a palette for a specific Choice field.]

We're already receiving many new feature requests from customers for our IntelliGantt Web Part. With an update just posted, we're happy to have fulfilled a common one: the ability to change the task colors in the Gantt chart.

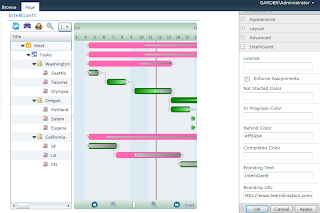
Here's how it works. Below is our default color scheme.


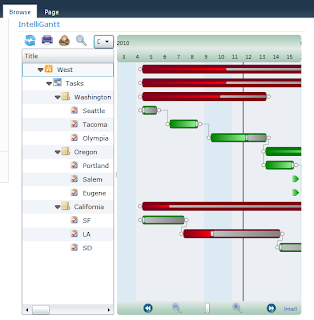
I think it's brilliant, but as we all know, one size (or color) does not fit all.

If you would like to change the default colors in the Gantt chart, put the web part into edit mode. In the IntelliGantt section, you now see the following options:


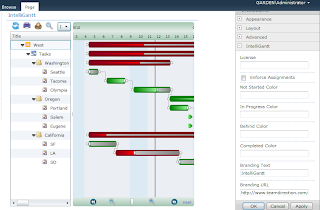
You'll notice the four properties named:

1) Not Started Color
2) In Progress Color
3) Behind Color
4) Completed Color

These properties align with the Task Status values within SharePoint:

1) Not Started
2) In Progress
3) OK, not a direct SharePoint mapping. But we thought seeing a 'Behind' task-- a task In Progress but not far enough along given its 'Percent Complete' value-- would be very useful.
4) Completed.

Let's go through each one and see how things look.

Some folks might want 'Not Started' tasks to really pop out. In this case, Magenta may be a good color.


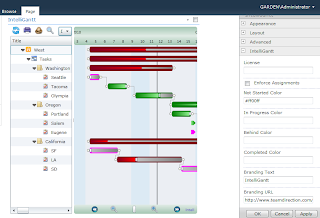
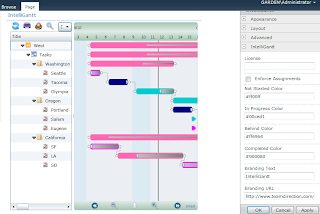
Note that the color value is represented as Hexadecimal RGB. Hopefully this isn't too inconvenient. Just google 'RGB to Hexidecimal color converter' and there's lots of resources on the web to get just the color you need in hex format.


Tasks that are In Progress always make people feel calm, serene and on top of things, so Dark Turquoise is the obvious choice:


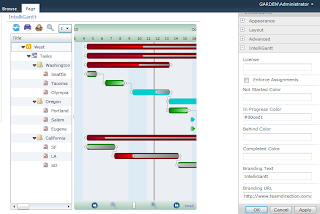
For tasks that are marked as In Progress in SharePoint but are in actuality Behind, it will be important to make them stand out. Nothing stands out more than Hot Pink:


Finally, we have the Completed tasks that anchor the project on its march toward completion. A good Navy Blue provides the weight we need:


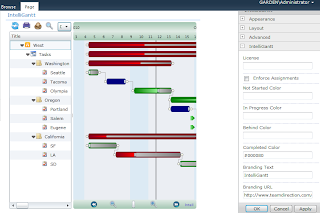
And the fully realized color scheme:


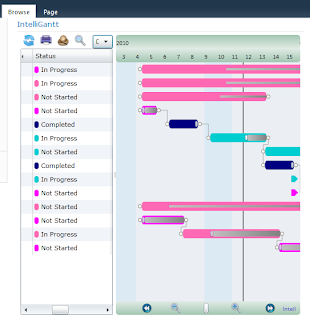
On another note, we also received a question in this blog asking if the IntelliGantt Web Part could show color next to the SharePoint status values as well. The answer is now 'Yes'. We provide a bit of color splash next to the Status to help you see which tasks are Hot Pink, ... er, Behind at a glance. Here's a shot of colors in the Status field with our new palette.


You know, maybe that is a better color scheme. Let me know if we should make these the default colors for the IntelliGantt Web Part :).