Showing posts with label BaseCamp. Show all posts

Friday, August 22, 2014

Simple Todo Item Costing with Basecamp

Basecamp by itself does not support levels of effort and hourly rates for people. Basecamp with IntelliGantt, however, most certainly does. We let you provide level of effort and hourly rate values for every person in your Basecamp project. Then, when you assign someone to a task, IntelliGantt will compute the cost for that task by multiplying the work * level of effort * hourly rate for that person. Combined with the cost rollup feature, you can quickly see how much a particular task is costing and even how much an entire project is costing. Here's how it works.

After you have allowed IntelliGantt to communicate with Basecamp and have chosen an account, you can select one or more projects to work with. When you select a project it gives you a quick overview of how much work and cost is involved for all the items in the project.

When you select a person in the 'People' dialog, you can quickly see how much work is assigned to that person and what their default level of effort and hourly rate are.

When you create or edit a task assignment, by default the values come from that users default level of effort and hourly rate. However, you can override this on an assignment-by-assignment basis, should you choose, with specific level of effort and hourly rate for that task assignment.

Put all this together and you can quickly see what the cost for both individual tasks are their rollups are.

Thursday, October 24, 2013

Adding Fields to your Projects

We just pushed out a new feature for our online gantt software that lets you create new fields in your projects. Right now we support text fields, numbers (including currency and percentages), dates, flags and choices. The new fields you create are available for every project and for every user you are collaborating with. You can also display these new columns within the gantt chart, search for values within these columns, print them and even download all the data. In short, we've made IntelliGantt extremely customizable for your project needs. Hopefully we've made it simple to use as well. Here's how it works.

Here is a basic project we've been using in our demos with the standard field layout.

If you move the mouse into any column header or select a column by tapping on it with your finger, you will see the 'cog' and '+' images appear.

The cog lets you configure the existing column. The + lets you create a new column. In this case we will click the +.

Notice that the task list grid now shows a 'New Column' header where we clicked the + sign. Also, a new window appears that lets you configure the new column. This is actually what you see if you had just clicked on the cog. When you clicked on the + it created the new column first and then brought up its editor. With this you can configure the 'Column Name' and the 'Display Name'. These are different because we anticipate you may wish to work with the data later and 'Column Name' can be something machines can use to reference data while 'Display Name' is more human friendly. Let's change both to be 'Extra'.

With the new Extra field we can enter values with in-place editing just like any other field. These values are now part of the project and visible/editable by any other IntelliGantt user.

You can go back to the field configuration at any time by clicking on the cog again. These custom fields are extremely flexible. You can change not only the column name and display name but also what type of data they display as well.

For example, another very useful type of field is 'Selection'. This lets you create a selectable list of values for IntelliGantt users, reducs the chance of data entry errors and thereby improve the 'Smart Search' results. You could always create another column with the field type you want, but here we will simply change it to 'Selection' and type in our values. We enter a 'blank' first line so that users have the option to blank out a cell.

Now instead of a text edit field we get a dropdown from which users can select the values we entered. Since we marked the field type as 'Selection', we can only select a single value. If we had chosen the 'Selections' field type, then the in-place editor would change to support multiple selections.

If you are an IntelliGantt for Basecamp user, then other IntelliGantt for Basecamp users will see the columns you create and you will see the columns your colleagues create. Team members just using Basecamp, however, will not see these new fields. Therefore this lets project managers track additional information important to the project but superfluous to others.

If you are an IntelliGantt for Google user, then other IntelliGantt for Google users will also see the columns you create and you will see the columns your colleagues create. Team members who use the IntelliGantt Task List will not automatically see them. You can control which fields are visible and editable for team members. As this picture shows, the IntelliGantt for Google configuration window has extra checkbox fields for these options.

Tuesday, September 24, 2013

Because Printing a Project is Important

We've just added basic printing support to our cadre of online project tools. Simple and effective, this lets you print exactly what you see on the screen. Look for the 'Print' image on the left-hand side of the Gantt Chart.

Clicking on this image button will bring up the print feature supported by the web browser. In this example, we are using Firefox. Chrome also works. We are using HTML5 to do the printing so other browsers will support it soon if not already. The print dialog reflects what's available in the underlying UI. You can select the printer and change settings just as you normally would.

In this example I'm actually going to click on the 'Properties' button and change the layout from portrait to landscape in order to see more of the timeline. You can fullsize the web page before printing to fit more pixels onto the paper. You can also adjust the IntelliGantt sliders at the bottom right to compress the timeline and the vertical separation of your tasks. The result is the task list and gantt chart printed out as you would expect..

This particular image was pulled from the native Microsoft Windows XPS format. A little easier than linking to a piece of paper in the office.

Wednesday, September 18, 2013

Adding Colors to Tasks and their Children

For all the folks who have been asking about how to change the colors of tasks in IntelliGantt, and there have been many of you, I have good news-- you can now change the color of any task in IntelliGantt! We also went a step further and added a toggle so that if you want that color to apply to all the sub tasks as well you just click a checkbox. Finally, if a sub task inherits a color from a parent task but you really want it to be purple, you can do that too. Let's take a look.

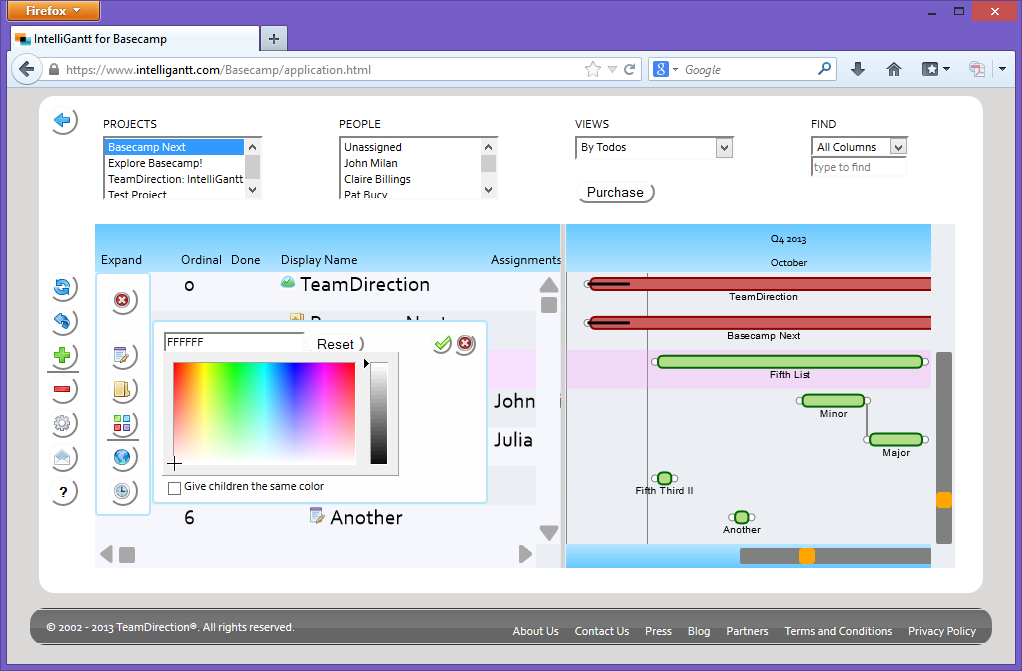
Here's a project within IntelliGantt for Basecamp using the default colors-- green for tasks that are completed or are ahead of the timeline and red for tasks that are not completed and behind the timeline. To change the color of a task first select it (in this case we have selected the task 'Fifth List') and click the '+' button on the left-side.

This brings up our new and improved palette of add options. This picture shows what it will look like the first time you click the '+'-- it will have the 'Add Task' option pre-selected for you. Hopefully it makes sense that to change colors you click on the four 'colors' image. A little underline under each image also tells you what is active at the moment.

Once the task and the color palette have been selected a color chooser pops up. By default it will be FFFFFF, which we are treating as 'use the default color'. You can change this by clicking anywhere on the color map. You can also change the luminosity with the vertical slider just to the right of the color map. As you make changes you will see the new hexcode in the edit box and the chosen color applied to the task.

If you would like to apply the same spiffy color to all of the select tasks sub tasks, we have the 'Give children the same color' checkbox for you. This can be overridden at the child task level by directly setting its color. If the child is just using the default color, then it inherits the parents color.

And that's it. Simply click the checkmark button to accept the changes or the X button to cancel and revert to the previous color scheme.

Once you accept or cancel the changes you go back to the palette options. You can either exit this palette by clicking the X at the top (highlighted in red) or choose another palette tool to work with. In this case, since the post is about colors, we will select the color palette and reset things back to the default scheme.

To reset the color scheme of the selected task back to the defaults, simply click the 'Reset' button. Or you can type FFFFFF back into the hexcode edit box.

Accept changes when you're ready, or if you change your mind later you can always click 'Undo'.

The color chooser feature is available in IntelliGantt for Basecamp, IntelliGantt for Google and IntelliGantt for Everyone. Coming soon, fun with columns!

Monday, July 08, 2013

Adding Hyperlinks to Tasks

New features are continuing to roll out for IntelliGantt for Basecamp, IntelliGantt for Google and IntelliGantt for Facebook. You'll see a steady stream of new column types that become available over the next few months, but first we have not a column type but a bit of metadata-- associating web hyperlinks with tasks. With this feature you can frame the context of your task with links to SharePoint documents, YouTube videos or PDF files on your internal network.

First select the task you wish to add the hyperlink to. Here we will select 'Change 2'.

Click the '+' button since we will be adding a hyperlink. What will popup is our 'super add' dialog that lets you add both new tasks and hyperlinks using the current selection as a point of reference. Note that 'Change 2' is bounded above and below. The 'Add Task Above' boundary lets you add a sibling task or a child of a sibling task above, depending if you click the left or right '+' button. The 'Add Task Below' boundary lets you add a sibling task or a child task below, depending if you click the left or right '+'.

But we are focusing on hyperlinks in this post. For that please note the 'Add Web Link' area consisting of two text boxes, two buttons ('+' and '-') and a dropdown select box. This is a multi-function control that lets you add hyperlinks by typing in the title and the link (or more likely pasting the link) and then either hitting the 'enter' key or clicking the '+' button. When this happens the title/link pairing is added to the list of hyperlinks for the selected task.

You can immediately view the hyperlink you just added in the dropdown .

You can use this dropdown to select any of the hyperlinks associated with a task. If you don't like one, simply remove it by clicking the '-' button. When you dismiss the add dialog you will now see a paperclip next to the task in the task list. When you see this paperclip it means the task has one or more hyperlinks associated with it.

To see all the hyperlinks associated with a task, simply click on the paperclip or, if using a tablet, touch the paperclip with your finger. A dialog appears listing all the hyperlinks for the task.

Each hyperlink has the actual link, the title supplied when creating the hyperlink and, if you're running the IntelliGantt project manager tool (as seen in these screenshots) the ability to remove the link by clicking the '-'. You'll most likely click the 'link', though, and see a new tab open up with the url.

Thursday, June 13, 2013

Reordering Todo Lists and Todo Items

You can reorder Todo Items and Todo Lists in IntelliGantt for Basecamp either by editing its 'Ordinal' value or by dragging the picture left of the Display Name vertically with your mouse or finger. Let's start with editing the Ordinal value. Simply left-click the mouse or touch your finger in the Ordinal cell of the Todo Item you wish to change.

You put in the value of where you would like to see the item end up. So we will put in '9' for two positions down the list. In IntelliGantt for Basecamp Todo Items are constrained so that they must remain with their same parent and siblings. If you enter a value outside this range the proposed change will be ignored.

The change won't actually take place until you hit the enter key.

You can also drag and drop Todo Items vertically by left-clicking with the mouse or touch with your finger the picture just to the left of the Display Name.

Similar to Ordinal values that must fall within the current parent, vertical movement will be constrained to within siblings of the same parent. As you drag you will see the other Todo Items reposition themselves.

You can also move Todo Lists by updating the Ordinal value or by dragging and dropping. To update by Ordinal value simply click in the Ordinal cell of the Todo List you wish to reposition.

Again you enter the value of the position you would like it to be in.

However, after the Todo List has been moved, it may end up with a different ordinal value since Todo Lists can contain varying numbers of Todo Items, which affects the Ordinal value calculation.

You can also drag a Todo List vertically by left-mouse clicking or touching the picture just to the left of the Display Name.

You drag the Todo List vertically just the same, but we do collapse Todo Lists as you move so that you don't have to move past all the Todo Items as well. This makes it faster to reposition Todo Lists in your project.

Tuesday, June 04, 2013

Smartly Searching Basecamp Todo Lists and Items

We have been listening to customer requests for new features to our IntelliGantt for Basecamp product and are happy to announce the number one request is now available: searching. You may have noticed that the top right of the 'old' IntelliGantt for Basecamp tool was a bit sparse. This was by design. We knew there would be a popular feature everybody would need and so we reserved the top-right of the tool to house it. Now when you bring up IntelliGantt for Basecamp you will see FIND with a dropdown and a text box.

The textbox lets you type in anything. The searching is interactive so as you type, with each keystroke, IntelliGantt for Basecamp will work through the columns to find any matches. We support several types of columns: Display Names are text, of course. Start and Finish are dates. Done is 'true' or 'false' (for example, to see all of your finished tasks, try typing false into the textbox). Percent complete is a number. By default any text you type in will be checked across all these columns, which is why the dropdown initially displays 'All Columns'.

The end result is important here as well. When a Todo List or Todo Item is found we display it with context. For example, when a Todo Item is matched, we also include its containing Todo List. This helps if you have multiple Todo Items with the same name that are distinguished by their Todo List.

If you have a particular column in mind you would like to match, simply select the dropdown for your list of options. You can match on the Basecamp columns 'Done', 'Display Name' and 'Finish' plus the columns we add: 'Start', '% Complete' and 'Predecessors'. We didn't include 'Assignments' in the dropdown because IntelliGantt for Basecamp already includes the 'PEOPLE' filter, which makes it very easy to select all items assigned to one or more people.

IntelliGantt for Basecamp supports Date and Number columns by simply matching their display. Using the Month/Day/Year format, you would search for all items with June 11th in them by typing in 6/11 in the text field. However, if you are searching for a date, you will probably want to select exactly which column you'd like to match. For example, if you want to find all items that are due on June 11th, then select the 'Finish' column and type in 6/11.

If you wish to use the Day/Month/Year format, simply choose it as the 'Date Format' and then type in '11/6'. You can change the date format by clicking the cog picture on the left-side of the tool.

Monday, May 13, 2013

Assigning a Todo Item to a Person

This one is quite straightforward. Every Todo Item in Basecamp can be assigned to a single project team member. Right now we handle a single assignment in IntelliGantt for Basecamp as well, though other IntelliGantt implementations (like the Standalone, Facebook and upcoming SharePoint versions of IntelliGantt) will support multiple assignments.

First you will want to select the Todo Item you wish to assign.

Next, left-click with the mouse or touch the Assignments cell for the Todo Item you want to assign. This will bring up an in-place dropdown control. Remember you can also have assignments show up and editable in the Gantt Chart as well. Simply click on the 'configuration' cog at the left of the task list and choose 'Assignments' to be in either display row 1 or display row 2 of the Gantt chart.

Todo Items with nobody assigned to them default with the 'Unassigned' selection. Remember you can choose the 'Unassigned' person in the PEOPLE select list in order to see all unassigned Todo Items in your projects. Here, though, we will simply select who to assign this Todo item to.

When you select the person in the dropdown list, the assignment is made.

Your new assignment will propogate to Basecamp immediately.

Remember you can undo assignments by clicking on the 'Undo' button to the left of the task list.