A brief note about a major new feature we've just put in-- integration with Basecamp.
Our philosophy has been, and continues to be-- provide the best tools on the desktop for the project manager to connect with his or her team.
The most productive tool for the project manager married with compelling and productive solutions for the team. We think it makes sense. See what you think of the screencasts. Or better yet, try it out for yourself. Both the IntelliGantt desktop and the IntelliGantt Add In for Microsoft Project have this feature as of today.
IntelliGantt Basecamp Introduction
IntelliGantt Basecamp Options
Microsoft Project Basecamp Introduction
Wednesday, April 29, 2009
Monday, April 27, 2009
Build 4.0.0.147 Released -- Task Master Support
We're keeping this here for posterity, but if you're looking for a great SharePoint Gantt Chart for visualizing and aggregating SharePoint tasks, we recommend the IntelliGantt Web Part.
Just a note that build 4.0.0.147 of IntelliGantt and the IntelliGantt Add In for Microsoft Project has been pushed to the web. This one has rich support for Bamboo Solutions Task Master web part. This improves the Gantt Chart experience in SharePoint with parent/child relationships, task dependencies, milestones and scaling.
You might also notice a new sharing option. Because we're still building the support pages it's still on the QT.
Friday, April 24, 2009
Now Supporting Bamboo's Task Master
We're keeping this here for posterity, but if you're looking for a great SharePoint Gantt Chart for visualizing and aggregating SharePoint tasks, we recommend the IntelliGantt Web Part.
We were hard at work building a great new connectivity feature into IntelliGantt when the phone started ringing.
'I need a better Gantt Chart within SharePoint.'
'How can I show parent child relationships in the SharePoint Gantt Chart?'
'Is there any way to show task dependencies in the SharePoint Gantt Chart?'
'What about scaling?' (I assume she meant 'in the SharePoint Gantt Chart' as well)
In fact, I think the single most popular post on this blog is this one-- all about creating a Gantt Chart view for your task list.
Point Taken! If only there was a good Gantt Chart for SharePoint.....
Turns out there is: the Task Master web part from Bamboo Solutions. In fact, last November we hooked up IntelliGantt and the IntelliGantt Add In for Microsoft Project to the Bamboo Project Portfolio Dashboard.
This April I'm pleased to say we just hooked up IntelliGantt (both flavors) to the Bamboo Task Master. Import, Export AND bi-directional synchronization supported. Resources with hourly rates, Costing and Work supported. Resource Pools, Templates, Multi-Project view all supporting excellent collaboration.
It's fresh out of the oven, but if you'd like to beta test it then send support [at] teamdirection [dot] com a note and you can try it today. The beta period shouldn't be long-- a week or so-- as the Task Master is built upon the standard SharePoint Task List which IntelliGantt has been working with for years. We just had to get the new fields Bamboo added situated-- Parent Task and Predecessor Task.
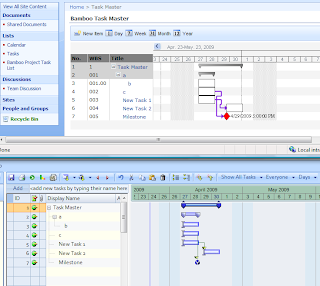
Here's a picture of the Task Master above and the IntelliGantt desktop below.
Now back to the really cool connectivity feature to surprise you with next week :)
We were hard at work building a great new connectivity feature into IntelliGantt when the phone started ringing.
'I need a better Gantt Chart within SharePoint.'
'How can I show parent child relationships in the SharePoint Gantt Chart?'
'Is there any way to show task dependencies in the SharePoint Gantt Chart?'
'What about scaling?' (I assume she meant 'in the SharePoint Gantt Chart' as well)
In fact, I think the single most popular post on this blog is this one-- all about creating a Gantt Chart view for your task list.
Point Taken! If only there was a good Gantt Chart for SharePoint.....
Turns out there is: the Task Master web part from Bamboo Solutions. In fact, last November we hooked up IntelliGantt and the IntelliGantt Add In for Microsoft Project to the Bamboo Project Portfolio Dashboard.
This April I'm pleased to say we just hooked up IntelliGantt (both flavors) to the Bamboo Task Master. Import, Export AND bi-directional synchronization supported. Resources with hourly rates, Costing and Work supported. Resource Pools, Templates, Multi-Project view all supporting excellent collaboration.
It's fresh out of the oven, but if you'd like to beta test it then send support [at] teamdirection [dot] com a note and you can try it today. The beta period shouldn't be long-- a week or so-- as the Task Master is built upon the standard SharePoint Task List which IntelliGantt has been working with for years. We just had to get the new fields Bamboo added situated-- Parent Task and Predecessor Task.
Here's a picture of the Task Master above and the IntelliGantt desktop below.

Now back to the really cool connectivity feature to surprise you with next week :)
Tuesday, April 21, 2009
Forms Based SharePoint Login
A few people have been asking about this as they're working with IntelliGantt. SharePoint has a feature whereby you can 'disable' NTLM login and instead present a web form authentication challenge. Up to now IntelliGantt would alway use NTLM by default. However, with build 4.0.0.146 (which we just posted), IntelliGantt provides the ability to force a login when first connecting with a SharePoint site.
The built-in Windows Login form will still appear, but the value IntelliGantt will use will duplicate the same username/password values in the form authentication.
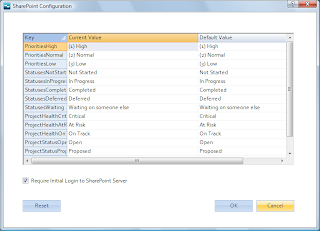
By default this 'Require Initial Login' is turned off. You turn it on by opening the 'SharePoint Settings' form. In the desktop this is found under the 'Settings' menu. In the Add In, it's also found under IntelliGantt->Settings. Because there are just a few way to customize SharePoint my hunch is you'll see more SharePoint Settings options in the future.
Here is the screen with the checkbox at the bottom. In case you're wondering what all the 'priority' and 'status' strings are for, this is how International users can customize the priority and status fields IntelliGantt uses when updating task values in SharePoint in your preferred language.

Friday, April 10, 2009
Modifying Content Types With Additional List Fields
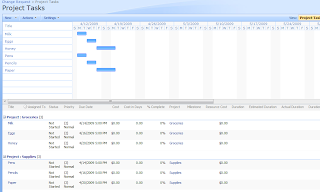
One of IntelliGantt's most powerful features is it's 'Workspace Settings', which allows the project manager to add fields to a task list, dynamically update read/write privileges, change their display name and description. When working with some templates, however, you may be flummoxed when you see your fields in the overall view (like Actual Duration and Duration):
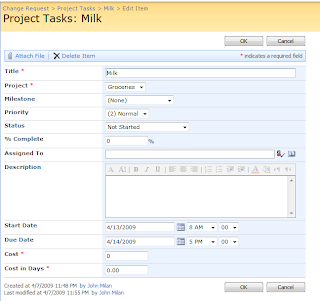
But when you go to edit a task, the custom fields are not there:
In fact, it feels like it should just work when you go to the task list's List Settings administration page and see the custom fields there:
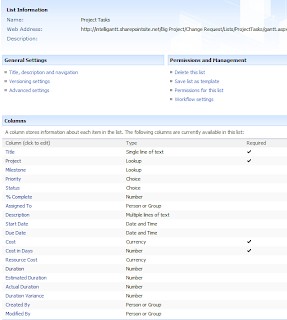
The unknown key to this conundrum is that the list is actually using a content type to define its fields. This specific list is from the the 'Change Request' template from the Microsoft 'Fabulous Forty' pack. Other templates from the 'Fabulous Forty' also use content types to define the fields for their Project Tasks, Project Milestones and other lists. In fact, content types are very powerful in that they encourage re-use. The problem here is more with the UI as the fact that a content type is in use is totally hidden.
To add your custom fields to the content type this list is using, first click on Advanced Settings, located in the General Settings group near the top. Clicking on Advanced Settings let's you see this very important setting:

In order to add fields to our content type we will need to manage the content type, so click 'Yes' for this setting. Now when we return to the List Settings page, notice a slight change (helpfully outlined in burgandy):

There's that content type! This Project Tasks list is using a 'Project Task' content type to define the fields. Click on the 'Project Task' entry which takes us to this page where we can refine it:
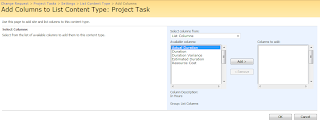
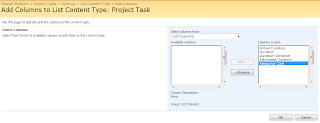
Select the custom fields you wish to add to the Project Task content type (all of them in this case):
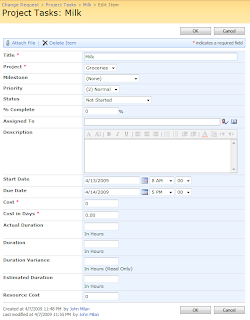
The end result is that now these custom fields will be available when you edit a task:
This isn't specific to task list, but is a general solution for how SharePoint binds lists with content types. The key is the enabling content type management in the Advanced Settings.
Thanks to Jack Hill from Oxbo International for working with us to solve this puzzle.

But when you go to edit a task, the custom fields are not there:

In fact, it feels like it should just work when you go to the task list's List Settings administration page and see the custom fields there:

The unknown key to this conundrum is that the list is actually using a content type to define its fields. This specific list is from the the 'Change Request' template from the Microsoft 'Fabulous Forty' pack. Other templates from the 'Fabulous Forty' also use content types to define the fields for their Project Tasks, Project Milestones and other lists. In fact, content types are very powerful in that they encourage re-use. The problem here is more with the UI as the fact that a content type is in use is totally hidden.
To add your custom fields to the content type this list is using, first click on Advanced Settings, located in the General Settings group near the top. Clicking on Advanced Settings let's you see this very important setting:

In order to add fields to our content type we will need to manage the content type, so click 'Yes' for this setting. Now when we return to the List Settings page, notice a slight change (helpfully outlined in burgandy):

There's that content type! This Project Tasks list is using a 'Project Task' content type to define the fields. Click on the 'Project Task' entry which takes us to this page where we can refine it:

Select the custom fields you wish to add to the Project Task content type (all of them in this case):

The end result is that now these custom fields will be available when you edit a task:

This isn't specific to task list, but is a general solution for how SharePoint binds lists with content types. The key is the enabling content type management in the Advanced Settings.
Thanks to Jack Hill from Oxbo International for working with us to solve this puzzle.
Sunday, April 05, 2009
Marking Fields with New or Unread Data
Up to now in IntelliGantt we've been marking entire rows as unread. Which is good, but considering an IntelliGantt row can have more than 100 custom fields, we thought we could do better. For instance, it might be useful to show which fields changed after a synchronization. It turns out the difference logic we use can do a field-by-field comparison, which means we can do something like this:

You can see the top two rows have unread markers on the left. More subtle is the dark gray circle in the top left of the task display name in row 2. This is the 'unread field' marker. We originally started with a similar 'unread task' marker in the cell, but it turns in to be a lot of yellow and is so vibrant its quite distracting.
The gray circle is not as visually intrusive so you won't lose track of the task data. There's also some interesting things we can do with this as well, such as changing its color when the mouse is over it. We're even thinking of making it behave like a button.
What will it do? Hmm... We have an idea for that.
Friday, April 03, 2009
Work, Estimated Work, Actual Work, Remaining Work and Work Variance All At Once
Here's a bit more detail on how you can track Work, Estimated Work, Actual Work, Remaining Work and Work Variance using either IntelliGantt or the IntelliGantt Add In for Microsoft Project with WSS 3.0/MOSS 2007.
First of all, you want to make sure your 'Workspace Settings' activate the work fields you need. For this example we will use all the Work Group and the Work Remaining fields, so we mark them as 'Members Read' and 'Members Write' like so:
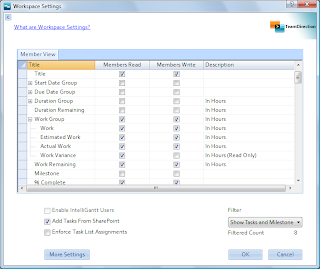
You won't be able to set the 'Members Write' checkbox for Work Variance because this is a read only field. That is, the value is always computed.
When you share a project to SharePoint with these workspace settings, you'll have the work fields you enabled available for you to edit, like so:
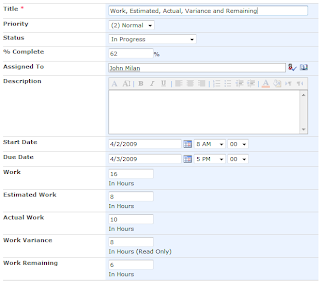
In IntelliGantt or Microsoft Project, when you update 'Work' fields, you will see the ramifications to your updates immediately with schedule changes, percent complete changes or work percent complete changes. This makes it easy to also undo a change. With SharePoint, we get all the data at once and its up to IntelliGantt to make sense of it.
So how does it handle changes to Work, Estimated Work, Actual Work and Remaining Work at once? IntelliGantt enforces an implied order to your changes. That is, IntelliGantt will order the datastream coming back from SharePoint and evaluate the 'Work' fields in the following order:
1) Work
2) Estimated Work
3) Actual Work
4) Remaining Work
Because IntelliGantt has its own scheduling model, it can apply changes that affect the schedule as it works down the list. For example, let's say I only update the Work field. We see in the above example it is 16 hours. What if I make it 24 hours?
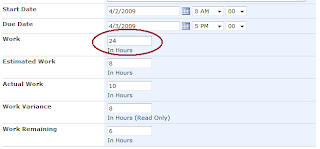
I click 'Update' in IntelliGantt and it communicates with SharePoint, performs its calculations and changes the list to...
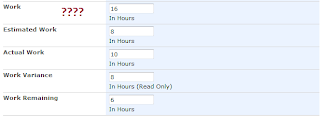
Wait a second, what happened? The answer is that first it applied the change to Work, which increased from 16 hours to 24 hours. This resulted in the project model being updated. Estimated Work and Actual Work were unaffected by this change. Remaining Work, however, was affected. In the IntelliGantt model the Remaining Work value jumped from 6 hours to 14 hours; an increase of 8 hours-- the same 8 hours we increased Work by.
However, the value in the SharePoint field Remaining Work was still 6. It had not changed. So, as IntelliGantt worked through the order of 'work field' updates, it computed the difference between the IntelliGantt models Remaining Work and SharePoint's incoming data value for Remaining Work. That value? Negative 8 hours, which cancelled the 8 hours we just added. The model worked perfectly! :)
For those non-model types (myself included in this category), we can do a couple things to change behavior so that our Work update 'sticks'.
1) We can turn off the 'Members Write' flag for the Remaining Work field. If this flag is off, IntelliGantt will not receive the Remaining Work value, the difference won't be computed and therefore the model won't add the opposite of the Work value we put in.
2) We can update what we want the new Remaining Work value to be. If we add 8 hours to Work, then we can add 8 hours to Remaining Work. When IntelliGantt adds the new Work value, it will add 8 hours to Work and to Remaining Work in its model. As IntelliGantt works through its order of updates, when it gets to Remaining Work, it will compare the incoming SharePoint value with the value in its model-- and it will match. So no update will happen. Which means Work will be 24 hours and Remaining Work will be 14 hours.
Would you believe there's actually a third way to update Work without updating two fields or performing any match? Remember that these work fields are processed in the order defined above: starting with Work and finishing with Remaining Work. We can take advantage of this and only update Remaining Work like so:
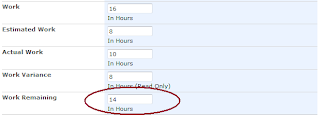
When IntelliGantt processes the incoming data, it will evaluate the work fields as follows:
1) Work -- No Change
2) Estimated Work -- No Change
3) Actual Work -- No Change
4) Remaining Work -- 8 hour change therefore add 8 hours to Work
Of course, we don't want to always add to our work load. We also want to get things done. This is best done by changing Actual Work to reflect how much work you've done and then by changing Remaining Work to reflect how much work you believe is remaining. For example, with our original values:
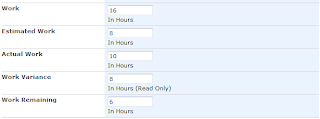
Let's say I've actually worked (yes, hard to believe) an additional 2 hours but believe there's still 5 hours remaining. In this case, I would add 2 hours to the existing 10 hours in Actual Work and subtract a single hour from Remaining Work.
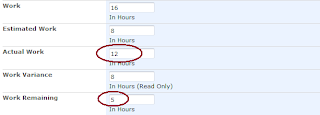
When IntelliGantt performs a synchronization, it will do the following:
1) Work -- No Change
2) Estimated Work -- No Change
3) Actual Work -- Add 2 hours and, by implication, subtract 2 hours from Remaining Work
4) Remaining Work -- Add 1 hour and, by implication, add 1 hour to Work
The end result will look like this:
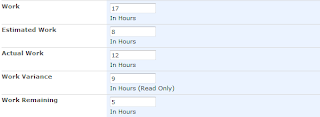
Granted, it is easier to simply modify the percent complete field and call it good. But if you'd like to be more rigorous than percent complete updates and want to start tracking hours, simple math with Actual Work and Remaining Work can lead to powerful results.
First of all, you want to make sure your 'Workspace Settings' activate the work fields you need. For this example we will use all the Work Group and the Work Remaining fields, so we mark them as 'Members Read' and 'Members Write' like so:

You won't be able to set the 'Members Write' checkbox for Work Variance because this is a read only field. That is, the value is always computed.
When you share a project to SharePoint with these workspace settings, you'll have the work fields you enabled available for you to edit, like so:

In IntelliGantt or Microsoft Project, when you update 'Work' fields, you will see the ramifications to your updates immediately with schedule changes, percent complete changes or work percent complete changes. This makes it easy to also undo a change. With SharePoint, we get all the data at once and its up to IntelliGantt to make sense of it.
So how does it handle changes to Work, Estimated Work, Actual Work and Remaining Work at once? IntelliGantt enforces an implied order to your changes. That is, IntelliGantt will order the datastream coming back from SharePoint and evaluate the 'Work' fields in the following order:
1) Work
2) Estimated Work
3) Actual Work
4) Remaining Work
Because IntelliGantt has its own scheduling model, it can apply changes that affect the schedule as it works down the list. For example, let's say I only update the Work field. We see in the above example it is 16 hours. What if I make it 24 hours?

I click 'Update' in IntelliGantt and it communicates with SharePoint, performs its calculations and changes the list to...

Wait a second, what happened? The answer is that first it applied the change to Work, which increased from 16 hours to 24 hours. This resulted in the project model being updated. Estimated Work and Actual Work were unaffected by this change. Remaining Work, however, was affected. In the IntelliGantt model the Remaining Work value jumped from 6 hours to 14 hours; an increase of 8 hours-- the same 8 hours we increased Work by.
However, the value in the SharePoint field Remaining Work was still 6. It had not changed. So, as IntelliGantt worked through the order of 'work field' updates, it computed the difference between the IntelliGantt models Remaining Work and SharePoint's incoming data value for Remaining Work. That value? Negative 8 hours, which cancelled the 8 hours we just added. The model worked perfectly! :)
For those non-model types (myself included in this category), we can do a couple things to change behavior so that our Work update 'sticks'.
1) We can turn off the 'Members Write' flag for the Remaining Work field. If this flag is off, IntelliGantt will not receive the Remaining Work value, the difference won't be computed and therefore the model won't add the opposite of the Work value we put in.
2) We can update what we want the new Remaining Work value to be. If we add 8 hours to Work, then we can add 8 hours to Remaining Work. When IntelliGantt adds the new Work value, it will add 8 hours to Work and to Remaining Work in its model. As IntelliGantt works through its order of updates, when it gets to Remaining Work, it will compare the incoming SharePoint value with the value in its model-- and it will match. So no update will happen. Which means Work will be 24 hours and Remaining Work will be 14 hours.
Would you believe there's actually a third way to update Work without updating two fields or performing any match? Remember that these work fields are processed in the order defined above: starting with Work and finishing with Remaining Work. We can take advantage of this and only update Remaining Work like so:

When IntelliGantt processes the incoming data, it will evaluate the work fields as follows:
1) Work -- No Change
2) Estimated Work -- No Change
3) Actual Work -- No Change
4) Remaining Work -- 8 hour change therefore add 8 hours to Work
Of course, we don't want to always add to our work load. We also want to get things done. This is best done by changing Actual Work to reflect how much work you've done and then by changing Remaining Work to reflect how much work you believe is remaining. For example, with our original values:

Let's say I've actually worked (yes, hard to believe) an additional 2 hours but believe there's still 5 hours remaining. In this case, I would add 2 hours to the existing 10 hours in Actual Work and subtract a single hour from Remaining Work.

When IntelliGantt performs a synchronization, it will do the following:
1) Work -- No Change
2) Estimated Work -- No Change
3) Actual Work -- Add 2 hours and, by implication, subtract 2 hours from Remaining Work
4) Remaining Work -- Add 1 hour and, by implication, add 1 hour to Work
The end result will look like this:

Granted, it is easier to simply modify the percent complete field and call it good. But if you'd like to be more rigorous than percent complete updates and want to start tracking hours, simple math with Actual Work and Remaining Work can lead to powerful results.
Subscribe to:
Comments (Atom)


