Tuesday, December 28, 2010

Basecamp Todo Items with Hours and Cost Information

The IntelliGantt Web Part for Basecamp lets you keep additional fields associated with specific Todo Items. Two such fields are Hours and Cost. Because they are numbers, the IntelliGantt Web Part for Basecamp will do basic rollup calculations. Both of these fields can contain decimal numbers.

Below is the initial view you may see for a Basecamp project.


If you scroll the task grid all the way to the right, you will see these two additional fields: Hours and Cost. They will not be available in the Basecamp UI, but their data is stored in Basecamp so every other user of the IntelliGantt Web Part for Basecamp will see the same data values.


Here we enter a few Hour values. Notice that the Todo List container the Todo Items rolls up the hours. Likewise, notice that the top level project rolls up the hours as well. This gives you a high level view of the hours in your project.


Similarly, the IntelliGantt Web Part will work the same for the Cost field.

Monday, December 27, 2010

Drag and Drop Local FIles onto Basecamp Todos and Milestones

We showed how dragging and dropping works with our IntelliGantt Web Part for SharePoint product, now let's see how you can drag and drop files from your computer onto Basecamp Todo Items and Milestones. This makes it easy to add multiple files to Basecamp using an elegant UI gesture everyone is familiar with and provide important context for why these files are in the project.

First, you need the IntelliGantt Web Part for Basecamp and a File Explorer. Here we show the Windows version.


Select one or more files, hold down the button to start dragging and move the mouse over your Todo Item or Milestone.


When your drag cursor is over an acceptable drop target (a Todo Item or Milestone), the IntelliGantt Web Part for Basecamp shows you an 'upload' arrow on the same row.

Once you drop the file, a dialog pops up for you to add a comment to (the files will be attached to this comment).


After typing in your comment, the files are added to Basecamp and associated with the Todo Item or Milestone.


If you mouse over the paperclip you will see a listing of all the files attach to the Todo Item or Milestone. You can click on any of these individual file lists and open up the target file.


If you are an administrator, you will see a '-' symbol. You can remove a comment (and the associated attachments) by clicking on the '-'.

When you mouse over the task in the Gantt Chart, you will see the full comment you added.


Finally, the comment containing files attached to you Todo Item or Milestone is stored in Basecamp and accessible via the web browser as you would expect.

Thursday, December 23, 2010

Editing Basecamp Todo Item Schedules

With the IntelliGantt Web Part for Basecamp you have the ability to not only change Due Dates for Todo Items and Milestones, but also to give Todo Items a Duration by establishing a Start date as well. Furthermore, you can link any two Todo Items in a typical task dependency relationship by dragging from the predecessor Todo Item's Endpoint to the successor Todo Item's Startpoint.

We created a detailed forum entry to show you how it's down. For example, here is an image describing the task dependency feature:


Also, the IntelliGantt Web Part for Basecamp supports a 'Read Only' mode that may be useful when you wish to share project information but don't want folks to change things.

Read Only information is also covered in the forum.

Wednesday, December 22, 2010

Grouping SharePoint Tasks by Assigned To

It's important to have an online location like a SharePoint Task List to share task information with your team. It's also very helpful to have multiple views you can apply to task lists in order to organize task data for you team members. SharePoint views handle the great majority of cases, but we found one particular view we could add value to-- By Assigned To.

This is an important view for both team members and project managers because it allows you to organize by person first and then task-- the opposite of the default task first and then additional meta data, of which Assigned To is one column.

For example, here is the default task list view in SharePoint:


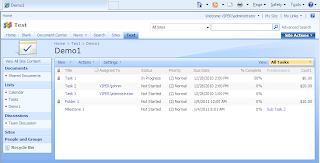
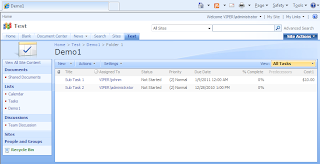
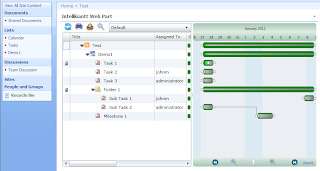
This particular list also contains summary tasks (called 'Folder 1') containing sub tasks. SharePoint doesn't show a full hierarchy so you have to click on 'Folder 1' to see its sub tasks in a separate page:


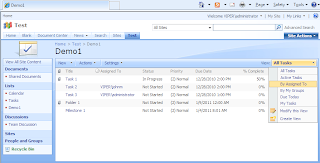
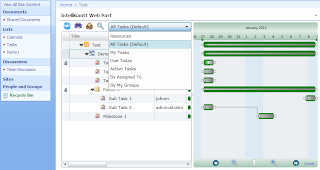
If we return to the topmost part of the task list, we can apply the 'By Assigned To' view that comes with SharePoint out of the box:

Select the view --


And see it applied --


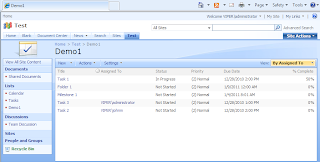
While the data is there, it's not very effective. There are two main problems. First of all, the orientation is still Task first, then Assigned To as one of many data columns. Second, the view is only applied to your page context-- remember those sub tasks under Folder 1? You can't see them.

The IntelliGantt Web Part solves both of these issues. First, by default we show you the full hierarchy of your task list (including that predecessor task dependency):


Next, we created a 'Resource' view that puts the people first! That is to say, we group all the tasks under a new 'Person' item, which we think provides a more intuitive display for folks to understand.

Select the 'Resources' --


And see it applied --


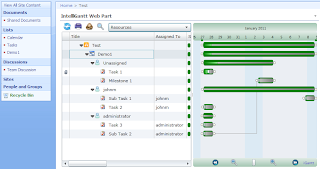
This let's you see all the tasks from the hierarchy in one view, organized by grouping them under people. Much better.

By the way, you can click on a 'Person' image and your web browser will open up SharePoint's information page for that person.

Tuesday, December 21, 2010

Viewing All Basecamp Milestones, Todo Lists and Todo Items Across All Projects

We've just enhanced the IntelliGantt Web Part for Basecamp to support viewing all the milestones, todo lists and todo items from the projects of your choice. You can select a single project, multiple projects or all projects. We've tested the IntelliGantt Web Part for Basecamp with thousands of items and it scales very well, providing you a great user experience now and in the future as your projects grow.

Furthermore, we've created several ways to view your Basecamp items--

1) A Default view that shows everything
2) A My Todos view that shows only todo items assign to you
3) A Milestones view that shows only milestones
4) A Resources view that groups all milestones and todo items by assignments.

And, of course, this is all done across as many Basecamp projects as you'd like.

Here's a screenshot of the Resources view.


You can try it yourself today and see what you think.

Monday, December 20, 2010

Attach Files to Task with Drag and Drop

One of the best reasons to use a Silverlight control on a SharePoint web page is you get rich features everyone expects. Perhaps the simplest, most intuitive one is dragging and dropping a file. It also happens to be one of the most powerful and we're happy to make it possible in our IntelliGantt Web Part for SharePoint. Now you can drag a file from your computer, drop it onto a SharePoint tasks and have it saved as an attachment.

This is a natural extension of how tasks are performed as often there is some digital output that can be associated with the task. While it was possible to add attachments before, the user experience was clunky and did not leverage the well-ingrained drag and drop metaphor.

Here is our forum page detailing how it works.

And here is what it looks like.


What's more, we also made it interactive. This means we popup supporting information when you mouse over the paperclip image. A popup list box will appear containing the names of each file attached to the task. You can select any name and the attachment will appear in a new browser window for you.

Finally, as easy as we made it to add files, we allow you to remove them individually as well. Simply click on the '-' symbol to the right of the file name to remove that attachment from the task.

And if this is just a bit too much power for you, you can disable this feature so that you can view and select attachments, but not add or remove them.

You can check out this web part today, either as a full-fledged WSP to install, or as a simple, quick desktop client demonstration.