SPTechCon is running from January 27 - January 29th. Somehow it still snuck up on me.
I am speaking at two sessions. The first session (407, January 28 at 2:45) is a deep dive in to SharePoint web services and how desktop applications, rich internet applications or even Silverlight and Flex can connect and update data. I'm pinging our hosted WSS server right now and retrieving lots of fun XML to go over!
The other session (805, January 29 at 1:30) covers out of the box project management. I'll be highlighting the project management goodness that comes with SharePoint: task list, project task list and dashboards. I'll also be using the latest 64-bit build of the IntelliGantt BETA. Gave me a good excuse to get a new laptop-- needed a test machine!
Tuesday, January 27, 2009
Tuesday, January 20, 2009
Publishing Multiple Projects to One SharePoint Task List
We just got a question from an IntelliGantt evaluator that calls to our attention a really great feature that we didn't expose very well. That is, the ability to publish multiple projects (and their tasks, of course) to a single SharePoint list. Customers had asked for this with the previous version of IntelliGantt (the Plus version) and therefore we added Multiple Project Export to version 4.
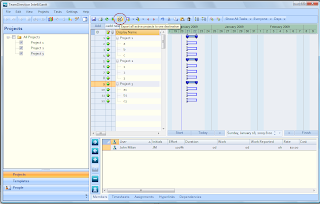
First, check all the projects you would like to be active by clicking the checkboxes in the 'Projects' view on the left. Then on the right, in our Grid/Gantt control, click the 'Export' button (highlighted in red). This will bring up the export wizard and will allow you to send this group of tasks as a whole to a single task list.
You also might want to use Workspace Settings and apply additional filters to what will probably be a large group of tasks. For example, you can apply the 'Milestones Only' filter so that only milestones from all the projects are sent to SharePoint. Other interesting filters are 'This weeks tasks', 'Next weeks tasks' and 'Summary tasks only.'
Even more filters are available, but you get the idea. IntelliGantt helps you round up groups of projects and send the important information to SharePoint.
First, check all the projects you would like to be active by clicking the checkboxes in the 'Projects' view on the left. Then on the right, in our Grid/Gantt control, click the 'Export' button (highlighted in red). This will bring up the export wizard and will allow you to send this group of tasks as a whole to a single task list.

You also might want to use Workspace Settings and apply additional filters to what will probably be a large group of tasks. For example, you can apply the 'Milestones Only' filter so that only milestones from all the projects are sent to SharePoint. Other interesting filters are 'This weeks tasks', 'Next weeks tasks' and 'Summary tasks only.'
Even more filters are available, but you get the idea. IntelliGantt helps you round up groups of projects and send the important information to SharePoint.
IntelliGantt API Example
Several of our clients have been very interested in using IntelliGantt APIs to customize the integration between Microsoft Project and SharePoint. We're happy to oblige and have just posted a Visual Studio 2008 C# solution that shows how you can:
1) Share projects to SharePoint, Local and Cloud workgroups
2) Update projects on SharePoint, Local and Cloud workgroups
3) Unshare projects from SharePoint, Local and Cloud workgroups
4) Create SharePoint task lists based on template IDs
5) Modify Workspace Settings, which in turn modifies the SharePoint task list when updating
6) Import project plans from MS Project
7) Read (ie. update) changes from MS Project to IntelliGantt
8) Export projects to MS Project
9) Write (ie. update) changes from IntelliGantt to MS Project
We opened up a new forum section to introduce and support the API as we start getting feedback-- and ideas!
The other part of this effort was creating a traditional MSI package to install IntelliGantt. This makes it easier for the example to reference IntelliGantt dlls since the ClickOnce installation generates human unfriendly paths and names, whereas the MSI puts assemblies in Program Files\TeamDirection\IntelliGantt.
(As a bonus, this also addresses deployment to Citrix environments, like Xen. Now the IntelliGantt executable can be explicitly identified and shared as a published resource.)
For the purposes of this API example, you'll want to install the MSI package first, and then unzip the C# solution.
The example doesn't show much in the way of actually working with a Project schedule. What it does show is just how amazing the SharePoint web services API is. Keep in mind that this is a client only install-- nothing is needed for the SharePoint server. (You can run this example against a hosted SharePoint server if you'd like). And yet you can do just about anything needed to move data back and forth. This means the door is wide open for integrating your project data with SharePoint services. We've tried to make the API as accessible as possible-- as easy and intuitive as the UI is-- but look forward to your feedback to see how well we've succeeded.
If you're curious about IntelliGantt's scheduling engine, you can do an Object Browse on the TDINETProjectModel assembly and see all it exposes. Most of the public names will make some sense. For our next API example, we will create a solution that highlights IntelliGantt's robust and feature rich scheduling engine, as well as templates, resources, assignments, filters, hyperlinks and task dependencies.
Finally, check out some of those enumerations to get an idea of what just might be coming down the road!
Thursday, January 15, 2009
Viewing SharePoint Tasks in a Calendar
[April 2011 Update - Integrating SharePoint Task and Calendar Lists]
In the last week or two I've started fielding more and more questions about viewing tasks in a calendar. It's usually along the lines of 'Do you guys have a calendar web part for tasks?'. To which I answer, 'you already have one in SharePoint'.
I don't see many quizzical response, most likely because these conversations are taking place over phone, but the quizzy vibes come through loud and clear. So I thought a little step-by-step primar illustrating how you can enable a calendar view in a standard, ordinary, run-of-the-mill task list would be helpful.
First of all, a SharePoint Task List is made up of three things: 1) a list, 2) task-specific fields (like Start Date and Due Date) and 3) multiple views. By default, you always have a 'raw data' view of all the fields, which, while utilitarian, isn't visually compelling.
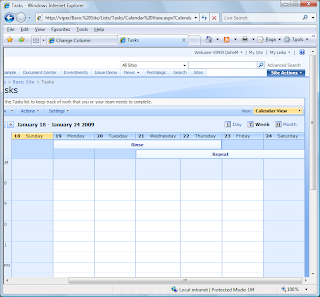
The most popular view for a Task List is the Gantt View. But, as these past weeks have made abundantly clear, not far behind is a Calendar View. Thankfully, SharePoint task lists support multiple views, and a calendar is one of them. It is a bit different than the calendar web part, but still very effective for viewing your tasks across months, weeks and days.
On to the steps. Here is a task list being shown in a pretty Gantt view.
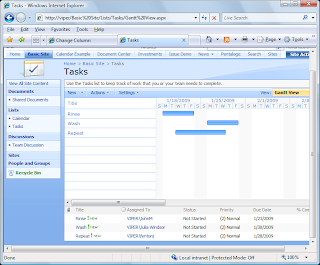
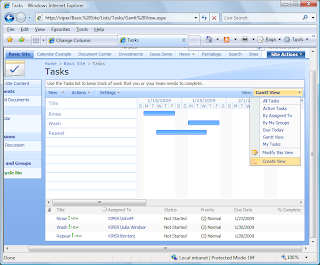
To see the Calendar view, we must drop down the 'View' button on the top right of the web part and create it. The menu pick is even called 'Create View'. (These images are kind of small on the page, but you can click on them to see more detail)
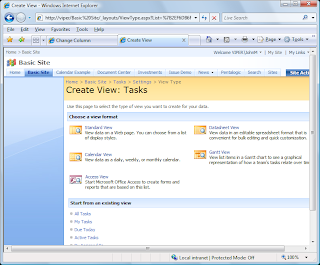
Clicking on 'Create View' takes us to this page, where we can choose the view we'd like. With every service pack, and especially with every major release, its a good idea to check out this page and see if any new goodies.... er... views are available.
Clicking on the 'Calendar View' takes us to the next page which lets us name and configure it. First we'll think long and hard and give it an original name like 'Calendar View'. You see a few options as well. Whether you you want to make this public and even the default view is influenced by how you want to configure it, as we will see shortly. For now, we'll move to the next batch of options.
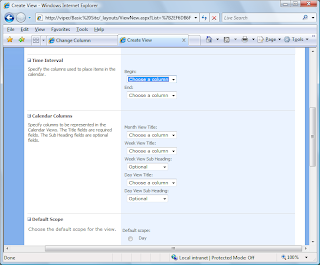
Most commonly you'll simply choose the start and due date fields of your tasks for your Time Interval options. But, if you use a product like IntelliGantt, which allows you to modify the SharePoint task list to contain Actual Start and Actual Finish, then this is how you could create an 'Actuals' calendar. That will be an excercise left to the reader as I'll choose the standard start and due dates.
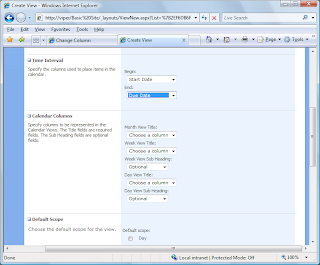
Calendar Columns is the next useful group. If you're asking 'why so many options?' for this group, its because you're defining a view within a view. That is, a calendar view can toggle among a month layout, a week layout or a day layout. First I'll define the titles for these three 'mini-views'.
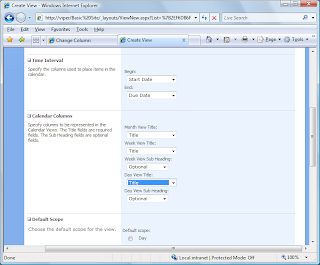
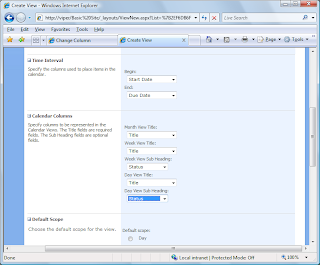
To be honest, I'm not sure how the sub headings are displayed. But I chose 'Status' anyway.
Finally, we can click OK and see the calendar. But before we do, take note of the Filter options. There are two powerful settings you can use to make the calendar view a bit more dynamic: [Me] and [Today]. Me resolves to the current user logged in to SharePoint and Today resolves to the days date. The following two screenshots show how they can be used.
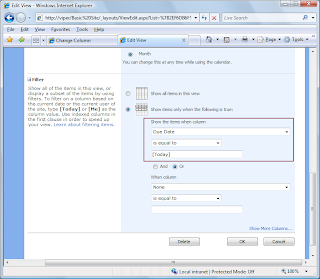
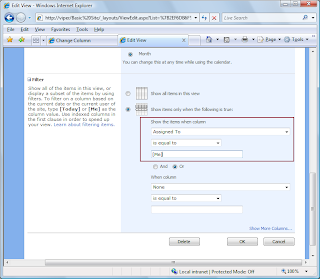
This will be another exercise left to the reader as our Filter options will look like this:
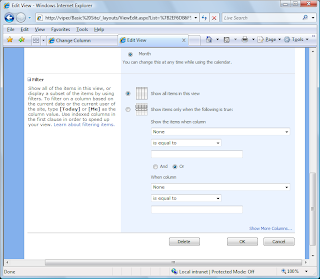
So where's this magical calendar view we've been working on? Click 'OK' and...
The Month view
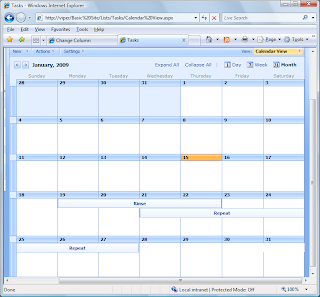
The Week view
The Day view
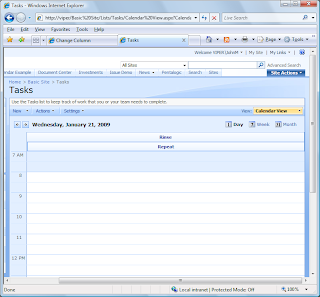
We're done. We've created a Calendar view of our Task List for everyone to use. However, one problem remains: how do I get all my tasks in to this Calendar? Do I have to add them one by one by hand?
That's where we come in. My company makes IntelliGantt and the IntelliGantt Add In for Microsoft Project. We make it so easy that its actually fewer steps to add all your tasks than it is to create this calendar view.
If you'd like to see them in action, we have IntelliGantt screencasts and Add In screencasts. Better yet, though, if you'd like to exercise IntelliGantt software yourself, we have 15-day fully functional free trial.
In the last week or two I've started fielding more and more questions about viewing tasks in a calendar. It's usually along the lines of 'Do you guys have a calendar web part for tasks?'. To which I answer, 'you already have one in SharePoint'.
I don't see many quizzical response, most likely because these conversations are taking place over phone, but the quizzy vibes come through loud and clear. So I thought a little step-by-step primar illustrating how you can enable a calendar view in a standard, ordinary, run-of-the-mill task list would be helpful.
First of all, a SharePoint Task List is made up of three things: 1) a list, 2) task-specific fields (like Start Date and Due Date) and 3) multiple views. By default, you always have a 'raw data' view of all the fields, which, while utilitarian, isn't visually compelling.
The most popular view for a Task List is the Gantt View. But, as these past weeks have made abundantly clear, not far behind is a Calendar View. Thankfully, SharePoint task lists support multiple views, and a calendar is one of them. It is a bit different than the calendar web part, but still very effective for viewing your tasks across months, weeks and days.
On to the steps. Here is a task list being shown in a pretty Gantt view.

To see the Calendar view, we must drop down the 'View' button on the top right of the web part and create it. The menu pick is even called 'Create View'. (These images are kind of small on the page, but you can click on them to see more detail)

Clicking on 'Create View' takes us to this page, where we can choose the view we'd like. With every service pack, and especially with every major release, its a good idea to check out this page and see if any new goodies.... er... views are available.

Clicking on the 'Calendar View' takes us to the next page which lets us name and configure it. First we'll think long and hard and give it an original name like 'Calendar View'. You see a few options as well. Whether you you want to make this public and even the default view is influenced by how you want to configure it, as we will see shortly. For now, we'll move to the next batch of options.

Most commonly you'll simply choose the start and due date fields of your tasks for your Time Interval options. But, if you use a product like IntelliGantt, which allows you to modify the SharePoint task list to contain Actual Start and Actual Finish, then this is how you could create an 'Actuals' calendar. That will be an excercise left to the reader as I'll choose the standard start and due dates.

Calendar Columns is the next useful group. If you're asking 'why so many options?' for this group, its because you're defining a view within a view. That is, a calendar view can toggle among a month layout, a week layout or a day layout. First I'll define the titles for these three 'mini-views'.

To be honest, I'm not sure how the sub headings are displayed. But I chose 'Status' anyway.

Finally, we can click OK and see the calendar. But before we do, take note of the Filter options. There are two powerful settings you can use to make the calendar view a bit more dynamic: [Me] and [Today]. Me resolves to the current user logged in to SharePoint and Today resolves to the days date. The following two screenshots show how they can be used.


This will be another exercise left to the reader as our Filter options will look like this:

So where's this magical calendar view we've been working on? Click 'OK' and...
The Month view

The Week view

The Day view

We're done. We've created a Calendar view of our Task List for everyone to use. However, one problem remains: how do I get all my tasks in to this Calendar? Do I have to add them one by one by hand?
That's where we come in. My company makes IntelliGantt and the IntelliGantt Add In for Microsoft Project. We make it so easy that its actually fewer steps to add all your tasks than it is to create this calendar view.
If you'd like to see them in action, we have IntelliGantt screencasts and Add In screencasts. Better yet, though, if you'd like to exercise IntelliGantt software yourself, we have 15-day fully functional free trial.
Tuesday, January 13, 2009
Summary Execution with Microsoft Project
After having explored the benefits of Master Projects / Sub Projects in Microsoft Project I thought I'd introduce a way to tackle a similar problem from a different angle. In the immortal words of Monty Python:
While there are many master projects with embedded, self-contained sub-projects, there are just as many, if not more, really large projects that span the deliverable in its entirety but baffle the team members with its complexity. We designed the next version of IntelliGantt to not only manage large projects in its user interface, but to also help manage large projects using Microsoft Project as well.
Why?
Because-- and I'm happy to admit this-- you shouldn't use IntelliGantt to build a nuclear power plant. Or an advanced airplane with all carbon-composite parts. For these types of projects you need the power of Microsoft Project and its million features to aid in the billion permutations that will happen along the way.
However, with IntelliGantt you can apply one of the simplest, most effective strategies-- Divide and Conquer.
V3 IntelliGantt Plus introduced the concept of identifying a summary task in Microsoft Project and working the project in IntelliGantt Plus. This worked fairly well, but customers told us we needed even more integration so that results could be written back to Microsoft Project when needed. Furthermore, reading new input from Microsoft Project was required to support big change events in the over-arching project plan.
The result is probably the richest integration of Microsoft Project of any application on the planet. With version four of IntelliGantt you can ask MS Project to open a project plan, select a summary task as your scope of operations, work with just the pieces that you need for and, finally, update the orginal plan with your results.
This gives you and your team several benefits
1) You work with a limited set of information thereby reducing complexity
2) Your team works with only the information they need
3) Nobody sees information they don't, or shouldn't, need
4) You can increase througput by having multiple project managers execute their pieces and letting IntelliGantt coordinate the updates
5) IntelliGantt let's you share project data with people that wouldn't normally have access-- like consultants outside a firewall.
We most definitely like Microsoft Project to be responsible for the heavy lifting when working with large projects. But IntelliGantt's rich collaborative abilities along with its nonpareil MS Project integration let's you open up the pieces to your project plans in ways not possible before.
Instead of working with one giant project en masse, IntelliGantt lets you work with and complete task groups defined by summaries. The best part is the bigger the project, the more effective dividing and conquering can be.
And yes, we have an excellent screencast showing this cleverness in action.

And now for something completely different.
While there are many master projects with embedded, self-contained sub-projects, there are just as many, if not more, really large projects that span the deliverable in its entirety but baffle the team members with its complexity. We designed the next version of IntelliGantt to not only manage large projects in its user interface, but to also help manage large projects using Microsoft Project as well.
Why?
Because-- and I'm happy to admit this-- you shouldn't use IntelliGantt to build a nuclear power plant. Or an advanced airplane with all carbon-composite parts. For these types of projects you need the power of Microsoft Project and its million features to aid in the billion permutations that will happen along the way.
However, with IntelliGantt you can apply one of the simplest, most effective strategies-- Divide and Conquer.
V3 IntelliGantt Plus introduced the concept of identifying a summary task in Microsoft Project and working the project in IntelliGantt Plus. This worked fairly well, but customers told us we needed even more integration so that results could be written back to Microsoft Project when needed. Furthermore, reading new input from Microsoft Project was required to support big change events in the over-arching project plan.
The result is probably the richest integration of Microsoft Project of any application on the planet. With version four of IntelliGantt you can ask MS Project to open a project plan, select a summary task as your scope of operations, work with just the pieces that you need for and, finally, update the orginal plan with your results.
This gives you and your team several benefits
1) You work with a limited set of information thereby reducing complexity
2) Your team works with only the information they need
3) Nobody sees information they don't, or shouldn't, need
4) You can increase througput by having multiple project managers execute their pieces and letting IntelliGantt coordinate the updates
5) IntelliGantt let's you share project data with people that wouldn't normally have access-- like consultants outside a firewall.
We most definitely like Microsoft Project to be responsible for the heavy lifting when working with large projects. But IntelliGantt's rich collaborative abilities along with its nonpareil MS Project integration let's you open up the pieces to your project plans in ways not possible before.
Instead of working with one giant project en masse, IntelliGantt lets you work with and complete task groups defined by summaries. The best part is the bigger the project, the more effective dividing and conquering can be.
And yes, we have an excellent screencast showing this cleverness in action.

Monday, January 05, 2009
Working with Master & Sub Projects

More than a few customers have let us know the importance of supporting Microsoft Project's Master Project / Sub Project configuration. It certainly makes sense because it gives you a nice rollup view and, more importantly, a convenient way to create and manage shared resource pools.
We're happy to introduce support for a Master Project / Sub Project scenario and, because the suggestions came from customers, we think folks will be pleased by the results.
As a brief overview, what we did was focus more on the sub projects and less on the master projects. By this I mean master projects really aren't 'updatable'. Rather, they are deriving their value from the collection of sub projects grouped in to the master view.
So what we did was make the behavior similar to if you were working on the sub project in its own window. That is, IntelliGantt recognizes when you have selected a sub project, or a task within a sub project, and adjusts its menus accordingly.
This lends itself to a very flexible way to share the pieces. That is, you could share all your sub projects in one SharePoint site. Or, if you really want to take advantage of IntelliGantt architecture, you could share every project to distinct SharePoint sites-- or even distinct SharePoint servers.
For example, one of the common use cases was a project manager with a master plan with two sub projects of completely different constituents. The first sub project might be for an in-house group whereas the second sub project might be with contractors who really don't need to know about everything (the life of a contractor :).
With IntelliGantt, you can share the first sub project to an internal server AND the second sub project to a distinct external host-- maybe even on the contractors own SharePoint server. Updates are scoped to the sub projects so the team members only see what they need. The project manager, on the other hand, can see everything together.
We think this matches the evolving needs of project managers to parcel out work for diverse teams.
But enough reading, check out the screencast and see IntelliGantt master the sub project landscape.
Subscribe to:
Comments (Atom)


